Access via Web
-
Admin
-
Technician
- How do I access my customer computer remotely?
- Can I access the customer's computer using my desktop?
- Is it possible to schedule a remote support session for my customers?
- Can I share my screen to provide remote support?
- Can I start a video call with my customers?
- Where can I view the sessions and their status?
- How do I begin working on a session?
- Can I work on a session that is not assigned to me?
- Is it possible to work on multiple sessions simultaneously?
- How do I invite a technician during a session?
- Can I invite a technician outside of my HelpDesk organization to join a session?
- How do I close a session?
- Where do I view the details of a session once it is completed?
-
Customer
- How do I allow remote access to my computer?
- I need a walkthrough of the HelpDesk application interface
- How do I use Whiteboard during a remote session?
- What should I do if the remote access seems suspicious or an unauthorized party is trying to access my computer?
- Can I end an ongoing session when my computer is getting accessed?
-
General
-
Viewer Lite
-
View
-
Utilities
- How do I receive files from a customer computer?
- Can I record an ongoing support session?
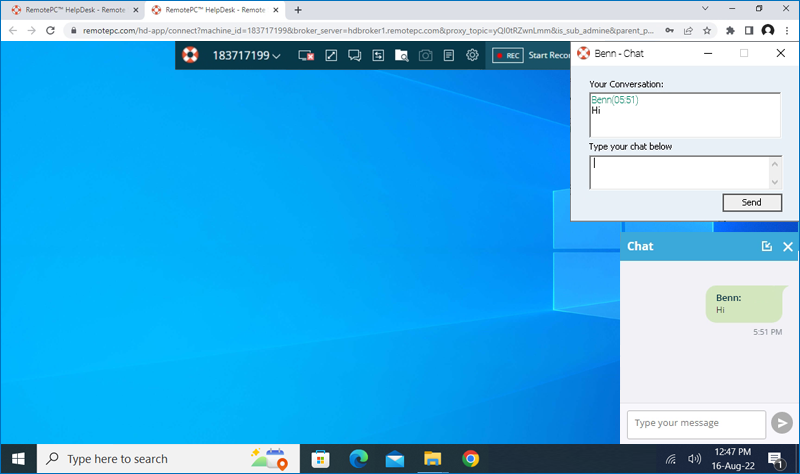
- How do I chat with the customer?
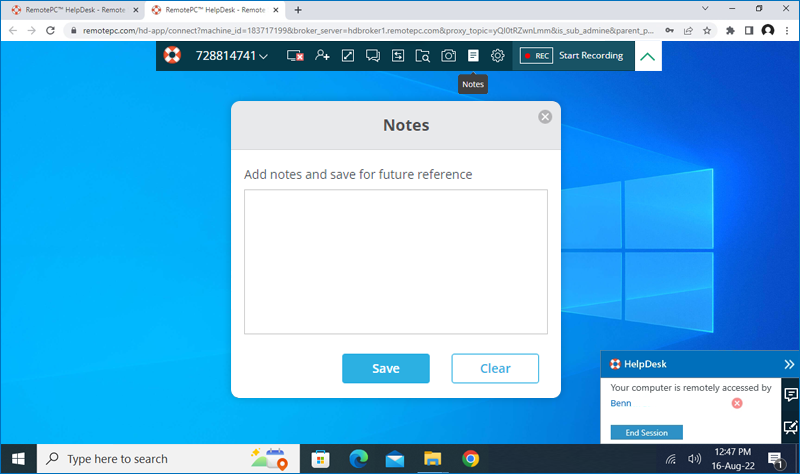
- Can I add notes during an ongoing remote support session?
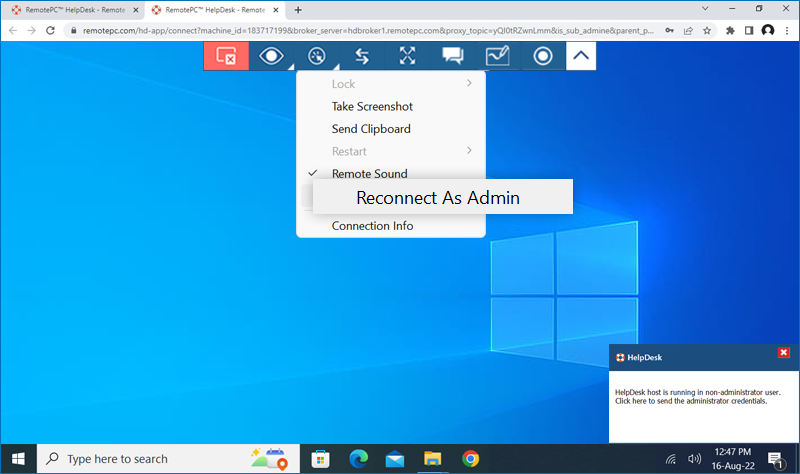
- Can I switch to the admin mode during an ongoing session?
- Can I lock the partner computer screen?
- Can I block keyboard and mouse input for remote computers?
RemotePC HelpDesk equips organizations with a fast and simple remote support platform to address customer queries. With HelpDesk, you can enable your technicians to remotely connect to customer PC, Mac, Linux, iOS, Android devices, and servers and offer real-time support. The technicians can also share their screen for product demonstrations, online training, etc. Technicians do not require any additional software installation to start remote support sessions.
HelpDesk can be set up easily, offers a simple user interface, and integrates seamlessly with your existing workflow.
To add technicians,
- Log in to HelpDesk via any web browser.
-
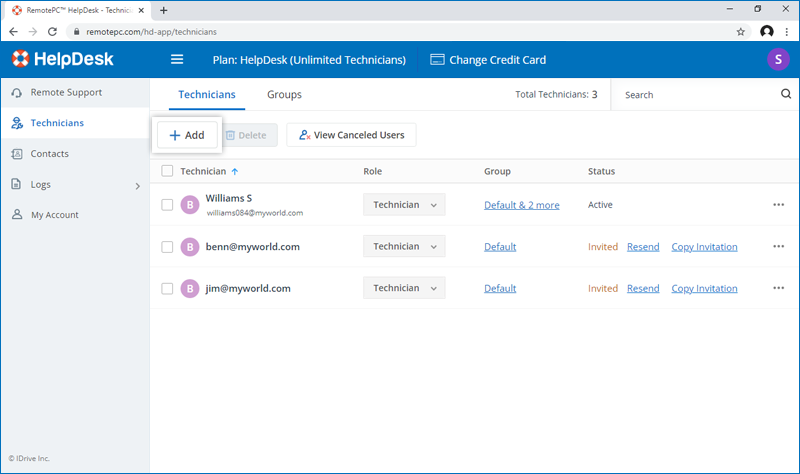
Go to the 'Technicians' tab and click 'Add'.
-
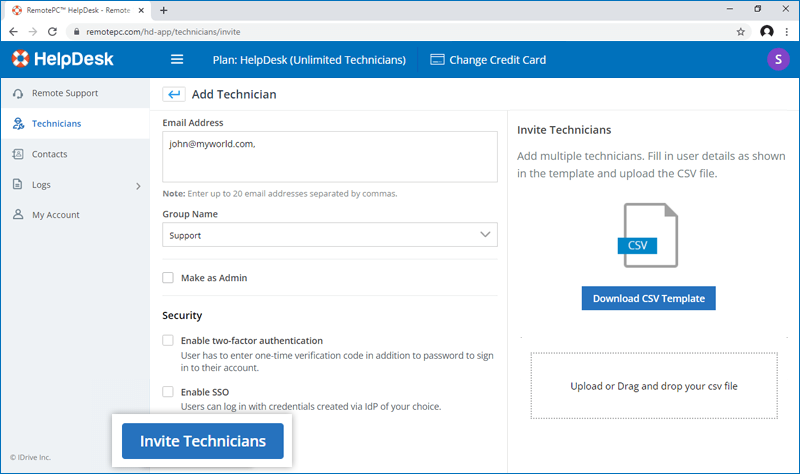
Enter the email addresses of the technicians you want to add, select a group, and if needed, grant administrative rights, enable two-factor authentication, and configure SSO.
Note: You can assign admin rights to a technician and enable two-factor authentication by selecting the appropriate checkboxes.
-
Click 'Invite Technicians'.
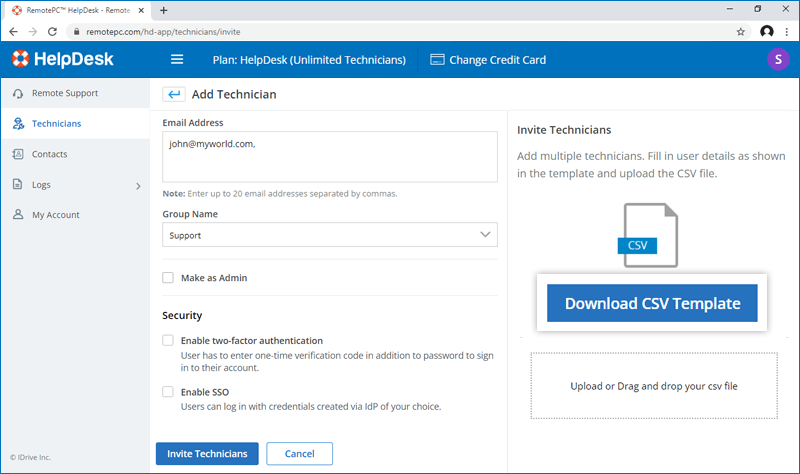
Yes, you can add multiple technicians to your account at a time by uploading a CSV file.
To invite technicians,
- Log in to HelpDesk via a web browser.
- In the 'Technicians' tab, click 'Add'.
-
Click 'Download CSV Template'.
-
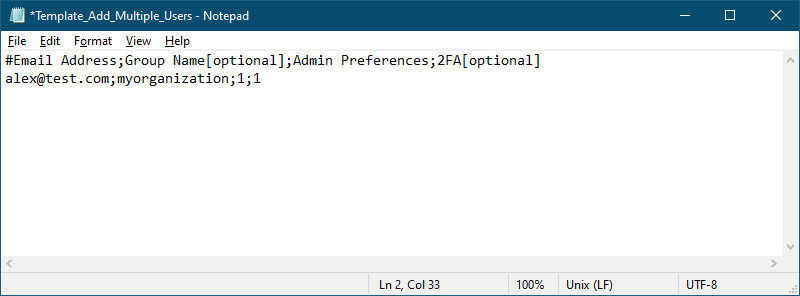
Open the downloaded file, delete the sample entry, and add the information for your technicians in any of the following formats (one line per user):
"EmailAddress,GroupName,AdminPreferences,2FA"
"EmailAddress;GroupName;AdminPreferences;2FA"
- Save the modified file.
- Drag and drop your saved CSV file onto the 'Upload or Drag and drop your CSV file' section. Alternatively, click the section to browse and upload your CSV file.
-
In the popup that appears, click 'Add Technicians'. A confirmation message appears after adding the users.
The invited technicians will get an email with the link to register to RemotePC™ HelpDesk. Once they register, their account will be added to your account.
Note: You can add up to 500 technicians at a time using the CSV file.
You can create a group of technicians, add or move technicians within a group. Sessions created within a group are available to all the technicians within the group. Multiple technicians can join a support session within the group.
- Log in to HelpDesk via a web browser.
-
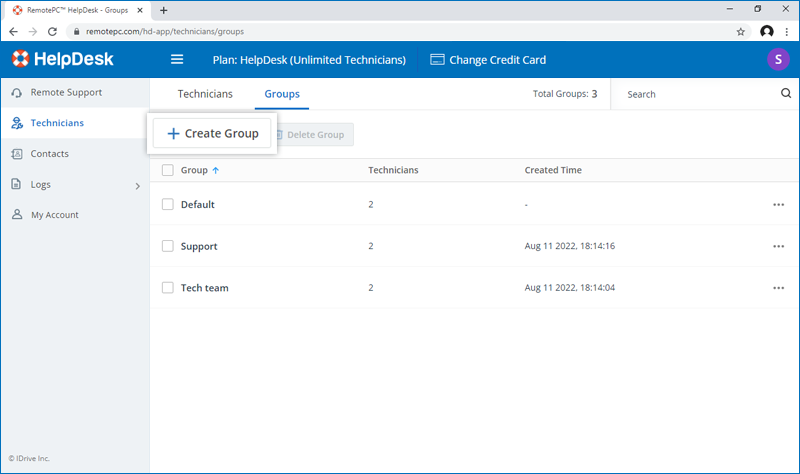
In the 'Technicians' tab, click the 'Groups' tab.
-
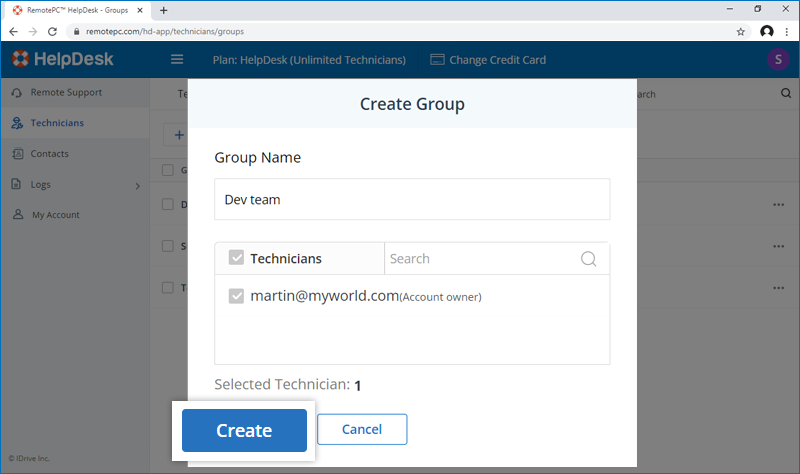
Click 'Create Group', enter the group name, search and add the technicians, and click 'Create'.
To add/move technicians to an existing group,
- Go to the 'Technicians' tab, click 'Groups'
-
Hover over
 against the group and select 'Add / Remove Technician'.
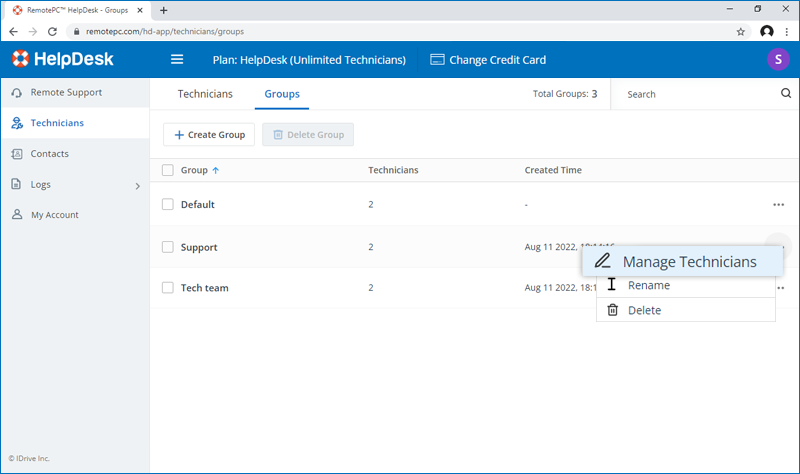
- Search for the technicians by entering their email addresses, select the checkbox, and click 'Update'. The technicians will be added to this group.
To move technicians between groups,
- Go to the 'Technicians' tab.
- Click the link under the 'Group' column for the required technician.
- In the 'Groups' popup select or remove the selection of groups as required.
- Click 'Done'.
You can view logs of all activities from the HelpDesk web interface.
The 'Web Activity Logs' tab displays logs of all web-based activities, whereas the 'Remote Session Logs' tab displays logs related to remote session activities. Check the recordings of video calls with your customers under the 'Meeting Recordings' section. You can view group and individual technician logs for a specific date range using the filters.
You can also view logs of all the resolved sessions from the 'Resolved Logs' tab. In this tab, you can also view logs for a particular group, technician, and date range through appropriate selections in the drop-down menu.
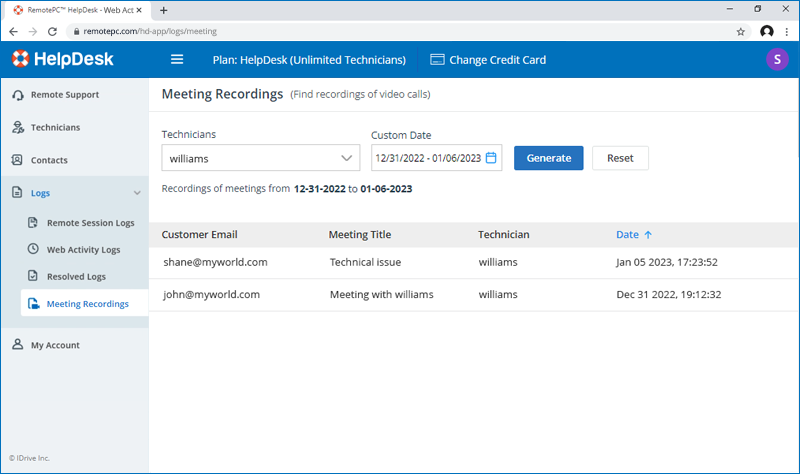
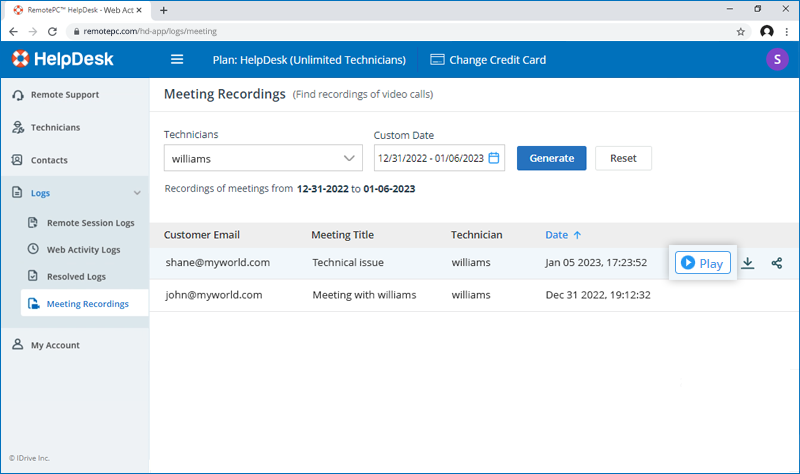
You can check the video recordings under 'Meeting Recordings' tab.
To check the recordings,
- Log in to HelpDesk via a web browser.
- Go to 'Logs' > 'Meeting Recordings' and the list of recordings will appear.
- Hover on the recording you wish to check and click 'Play' to view and listen to the video call.
- You can also download, share, or delete the recordings.
Admins, as well as any technician of a RemotePC HelpDesk account, can create a 'session' to access the customer computer and provide remote support. There are two ways to access a customer computer: instant and scheduled sessions.
To create an instant session,
- Log in to HelpDesk via a web browser.
- Click the group drop-down at the top-right corner to select the group where you want to add the remote session.
-
In the 'Remote Support' tab, enter the customer's email address and click 'Start Now'.
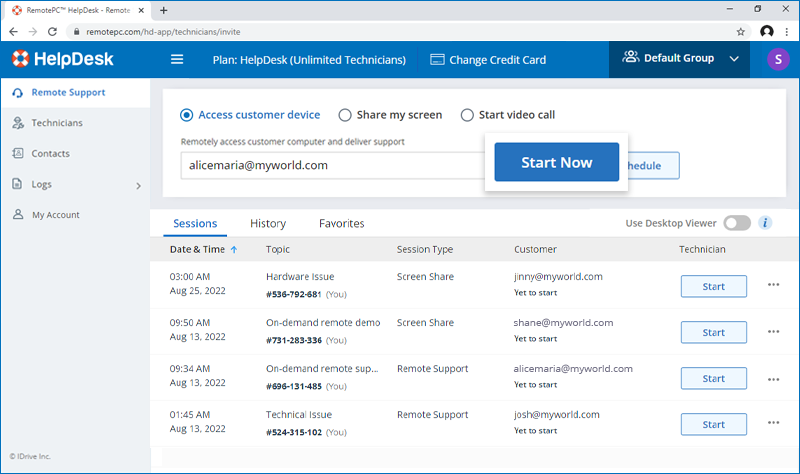
Note: If you enter the email address, the customer will receive an email invite to initiate the remote session.
Alternatively, click 'Start Now' and copy the session link/code to share with the customer to invite them. You can also invite via email or SMS.
- Once the customer accepts the invite, click 'Join' to download the setup and initiate the remote session.
Yes, technicians can access a customer's computer using a desktop.
To access the customer's computer using a desktop,
- Log in to HelpDesk via a web browser.
- Ensure that the toggle button is enabled for 'Desktop Viewer'.
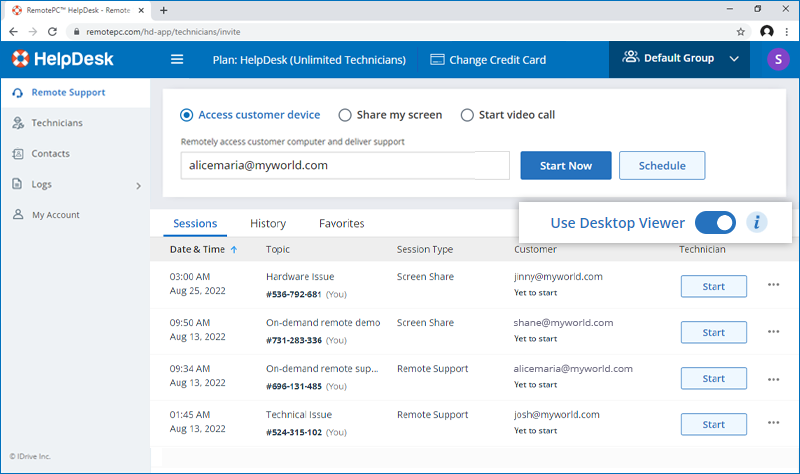
- Click 'Start Now' to start an instant customer support session and share the invite with the customer. The customer must follow the instructions and install the HelpDesk set up on their computer.
- In the remote support window, click 'Launch' to open the desktop launcher.
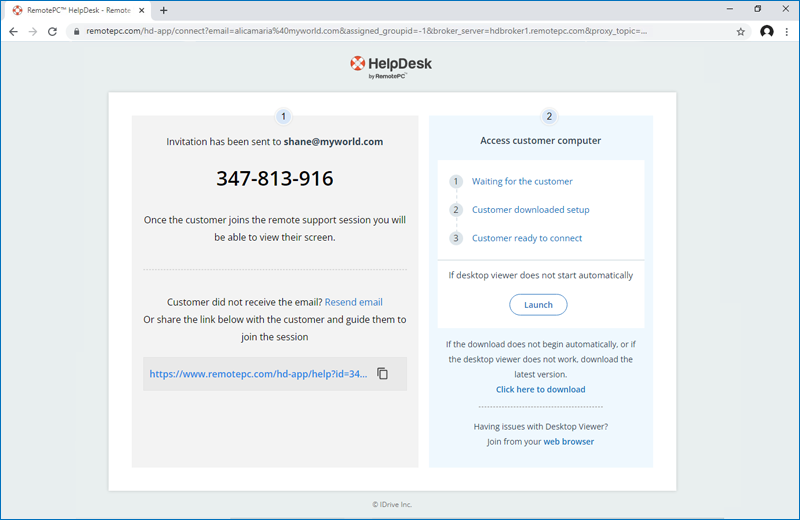
Note: You will only be able to launch a remote support session once the customer has installed the HelpDesk setup on their computer.
- If you have already installed the desktop launcher, click 'Open HelpDesk' to open the desktop launcher.
If you have not installed the application, click 'Click here to download' to download the desktop launcher and install it.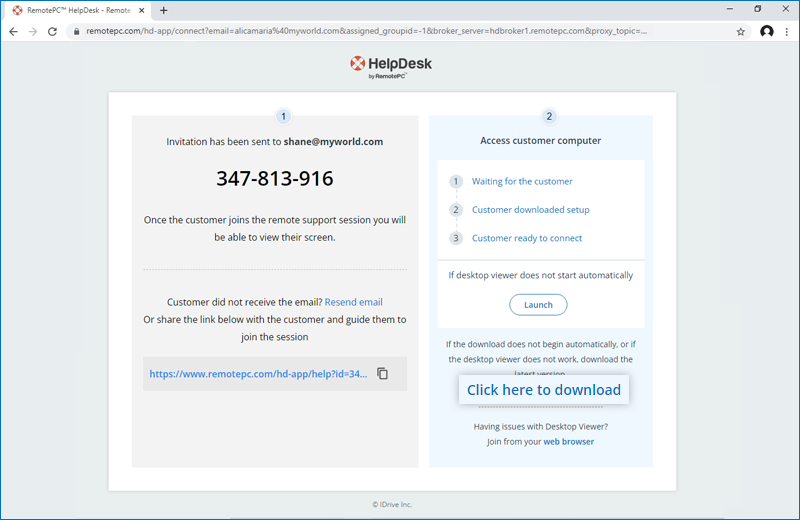
- Once the customer has accepted the invite, a support session will be established with the customer using the desktop launcher.
Yes technicians can schedule remote support sessions with customers.
To schedule the session,
- Log in to HelpDesk via a web browser.
- Click the group drop-down at the top-right corner to select the group where you want to add the remote session.
-
In the 'Remote Support' tab, click 'Schedule'.
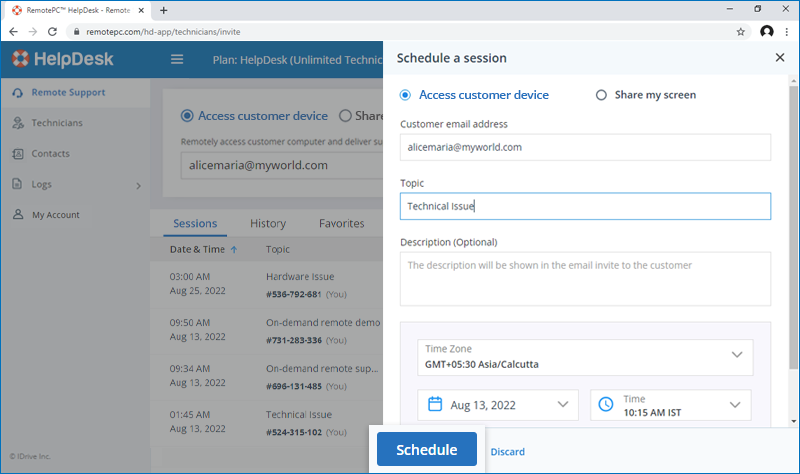
- In the Schedule screen, enter the email address, time, and date and set a reminder.
- Click 'Schedule'. The customer will receive an email invite with the details of the session.
- Click 'Join' to download the setup and initiate the remote session.
Yes, Admins and technicians can share their screen with the customers to provide a remote demo.
To share the screen instantly,
- Log in to HelpDesk via a web browser.
- Click the group drop-down at the top-right corner to select the group where you want to add the remote session.
-
In the 'Remote Support' tab, click the 'Share my screen' radio button and click 'Start Now'.
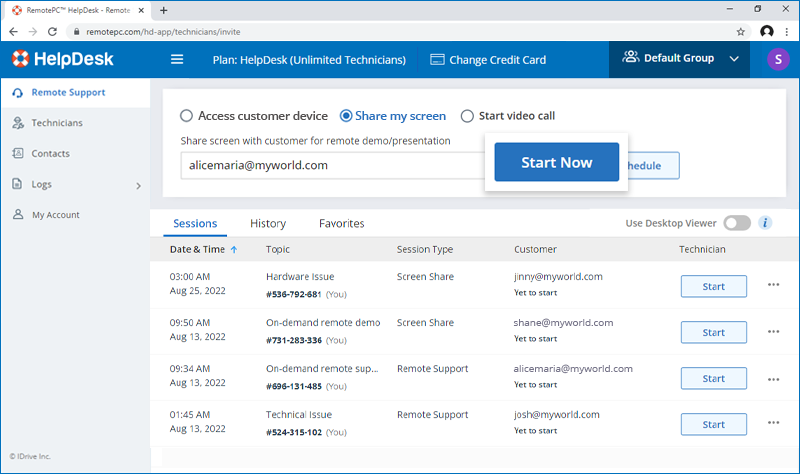
- The connection screen will appear. A setup will be downloaded to your system. Launch this application to share your screen.
- Share the link, code, or send an email invite to the customer to join the session.
To schedule the screen sharing session,
- Log in to HelpDesk via a web browser.
- Click the group drop-down at the top-right corner to select the group where you want to add the remote session.
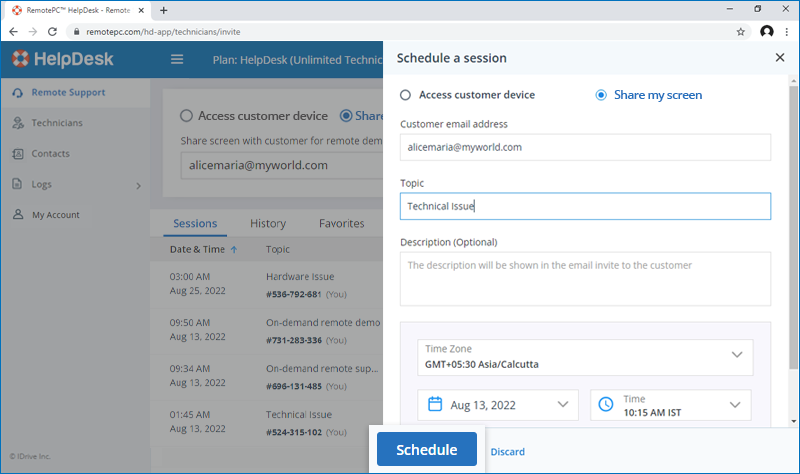
- In the 'Remote Support' tab, click the 'Share my screen' radio button and click 'Schedule'.
- In the Schedule screen, enter the email address, time, and date and set the reminder.
-
Click 'Schedule'. The customer will receive an email invite with the details of the session.
- Click 'Join' to download the setup and initiate the remote session.
Yes, you can invite customers for a video call.
To start video call,
- Log in to HelpDesk via a web browser.
- Click the group drop-down at the top-right corner to select the group where you want to add the remote session.
- In the 'Remote Support' tab, click the 'Start video call' radio button.
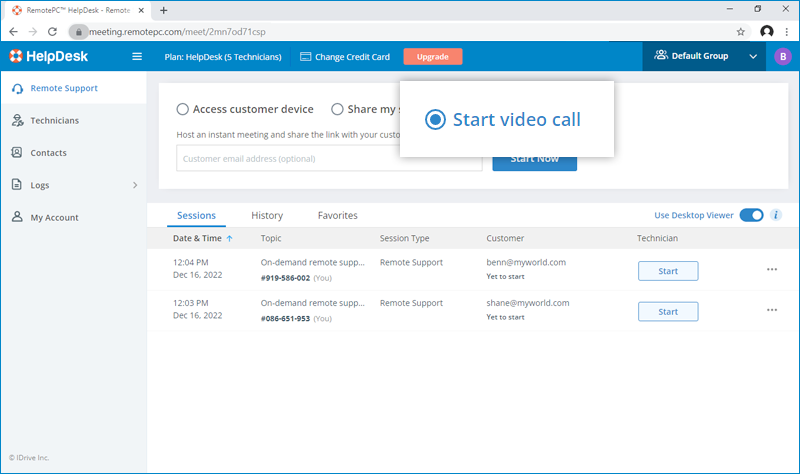
- Enter the customer email address and click 'Start Now'. The customer will receive the meeting invitation.
- The RemotePC Meeting screen will automatically launch. You can also copy the meeting link from the web browser and share with the customer.
- For the first time, you and the customers will need to provide the permission to access the camera and microphone on your computers.
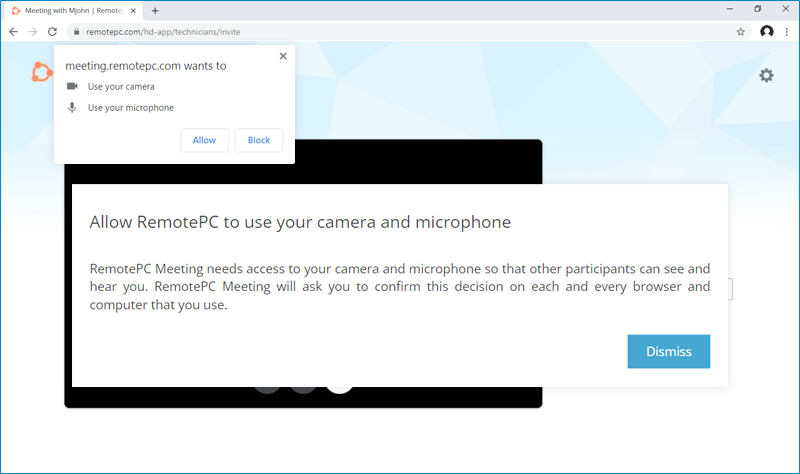
- Once the permission is granted, you and your customer can click 'Join' to begin the video call.
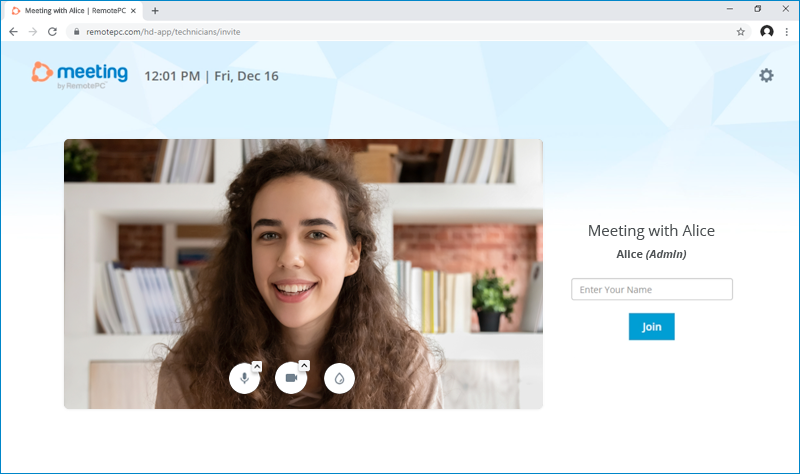
Check the video recordings under 'Logs' > 'Meeting Recordings' in the HelpDesk web interface.

You can view the list of sessions and session details in the 'Remote Support' tab. The 'Session' sub-tab will display the following details:
- Date and time of the session
- The topic/query to be covered in the session
- The type of session, either remote support or screen share
- Customer detail and session status
- Technician option to initiate or end the session, and edit scheduled session
You can also view your resolved sessions in the 'History' tab. Mark your important sessions in the 'History' tab by clicking  . The list of important sessions will be displayed on the 'Favorites' tab.
Note:
- This functionality is currently not available for EDGE browsers.
- Sessions with a valid customer email address can only be marked as Favorites.
To begin working on a session,
- Log in to HelpDesk via a web browser.
- In the 'Remote Support' tab, click 'Join' corresponding to the required session.
- Once the connection setup is also downloaded on the customer computer, the remote support session will be initiated.
Yes, you can work on a session that is not assigned to you or anyone in your group. Click the group drop-down at the top-right corner to select your group. All the sessions created for your group will be displayed under the 'Remote Support' tab.
To work on a session,
- Log in to HelpDesk via a web browser.
- In the 'Remote Support' tab, click 'Start' against a particular session.
Yes, a technician can work on multiple sessions simultaneously.
During a session, you can invite another technician who belongs to the same account. You can invite the technician via email.
To invite a technician during a session,
- During a remote session, click
 from the menu bar.
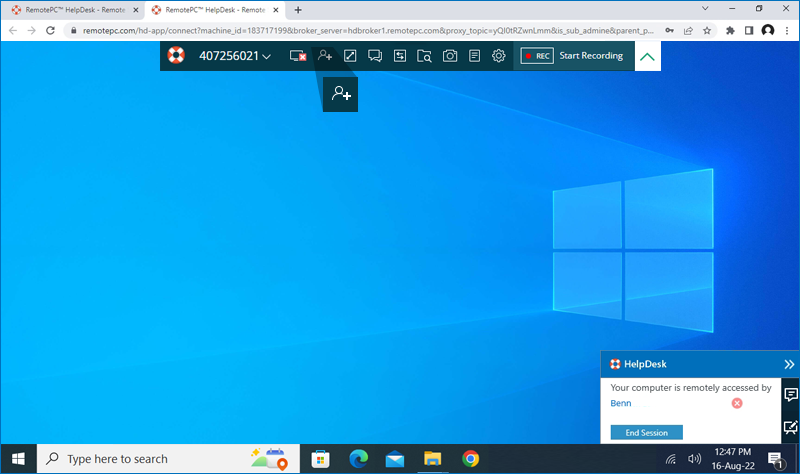
- In the 'Internal' tab of the 'Invite Technician' popup enter the email address of the technician you wish to invite and click 'Send'.
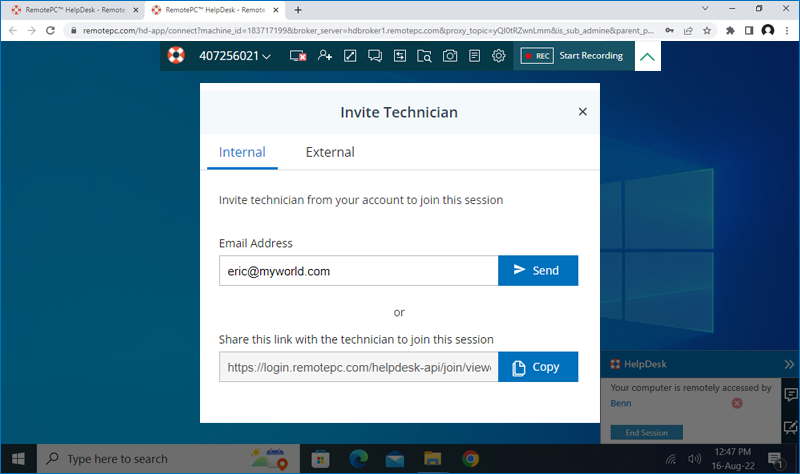
- The Technician will receive an email invite.
Alternatively, you can copy the link and share it with the Technician.
Yes, you can invite a technician outside of your HelpDesk organization to join a session.
To invite an external technician,
- During a remote session, click
 from the menu bar.

- Go to the External' tab in the 'Invite Technician' popup.
- Enter the email address of the technician you wish to invite and click 'Send'.
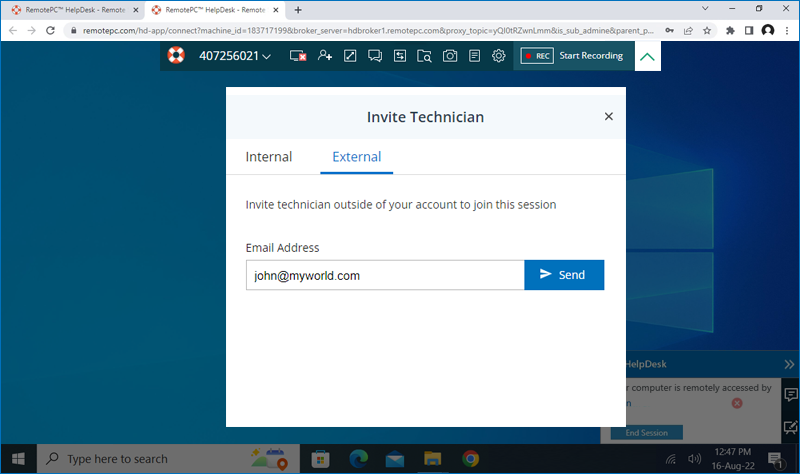
- The Technician will receive an email invite and a OTP to join the session.
- Guide the technician to open the link received in the email and enter the OTP.
On successful validation they will be able to join the support session.
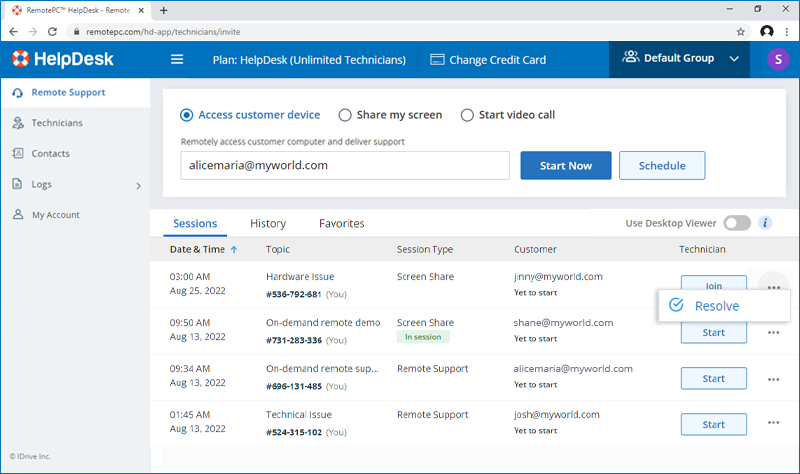
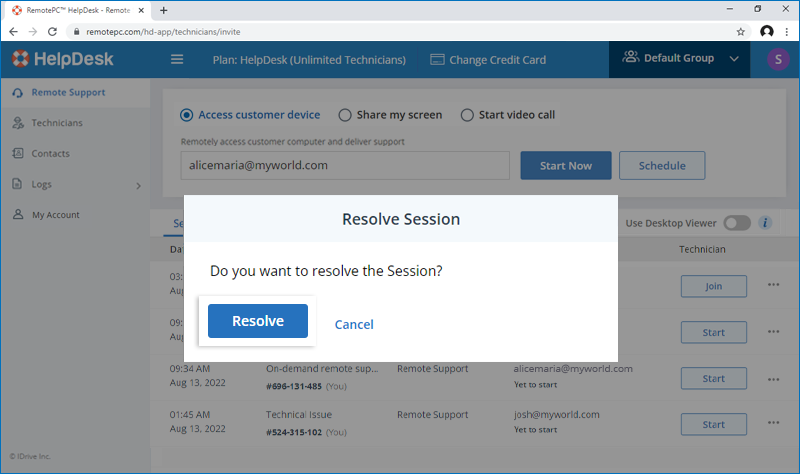
You can close any session, except an ongoing session, by marking it as resolved. You can select this option once the session has been attended to.
To close the session,
- Log in to HelpDesk via a web browser.
- On the 'Remote Support' tab, click
 against the session you want to resolve.
 -
Click 'Resolve'.
-
In the pop-up that appears, click 'Resolve'.
To view the session details,
- Log in to HelpDesk via a web browser.
-
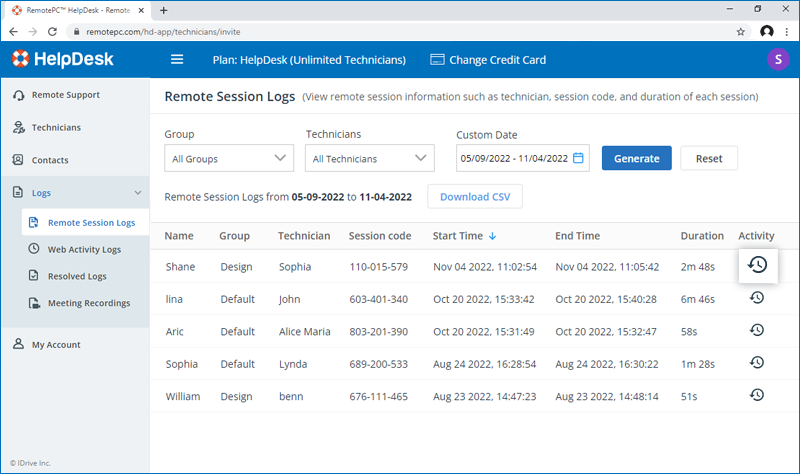
Click 'Logs' > 'Remote Session Logs'. Click
 against the session to see the details of the session and you will find related snapshots, notes, recordings, etc.
Once a session is created in HelpDesk, you will receive a session code or link from the technician. Or you may receive an email invite with the session link.
To allow access to your computer,
- Open the link in a web browser or go to https://help.remotepc.com and enter the session code.
-
Click 'Start Download'. The HelpDesk application setup is downloaded on your computer.
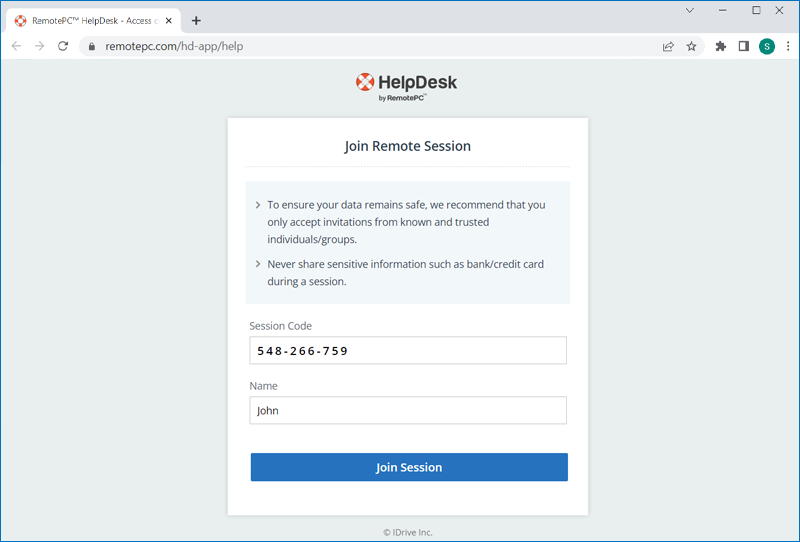
- Install the Helpdesk setup. The technician can now begin accessing your system.
The application will be uninstalled from your computer once the support session is terminated or marked as resolved by the technician.
HelpDesk is a minimal UI application with options to manage proxy settings, send error reports, and check the version. The main window displays the session code and the status of your remote session.
To modify proxy settings,
- Click
 the beside the name of the computer.
 -
Select 'Proxy Settings'.
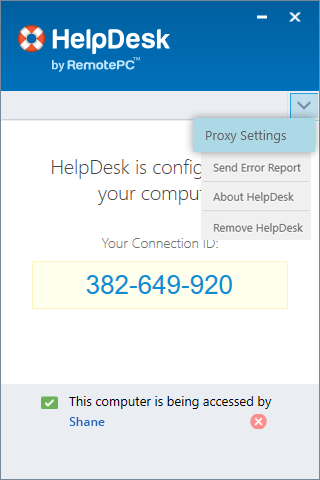
- Update the required settings and click 'OK'.
To send an error report,
- Click
 the beside the name of the computer.
 -
Select 'Send Error Report'.
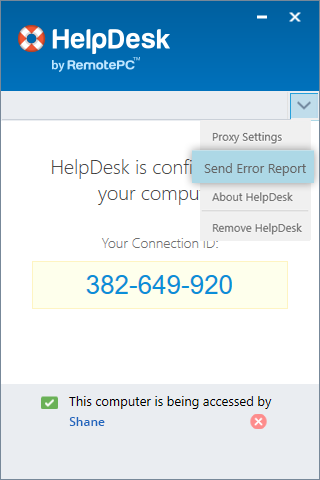
- Enter your query or describe the issue and click 'Send'.
With Whiteboard, you can draw on the remote screen during a session to collaborate effectively.
To use Whiteboard,
- Log in to HelpDesk via a web browser and establish a remote connection with the customer computer.
-
Click
 on the desktop notification. The whiteboard panel will pop up on the screen.
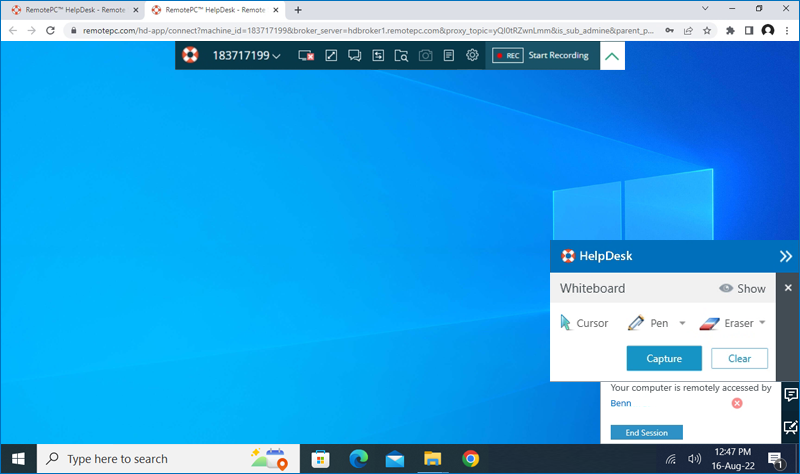
You can choose from the following options:
- Cursor: Selected by default, allows you to access the remote computer.
- Pen: Select to draw on the remote screen. Choose a line width or color of your preference.
- Eraser: Select to clear parts of the drawing on the screen. Choose a suitable width for the eraser.
- Capture: Select to capture a screenshot and save it on the local computer.
- Clear: Select to clear the entire drawing on the screen.
What should I do if the remote access seems suspicious or an unauthorized party is trying to access my computer?
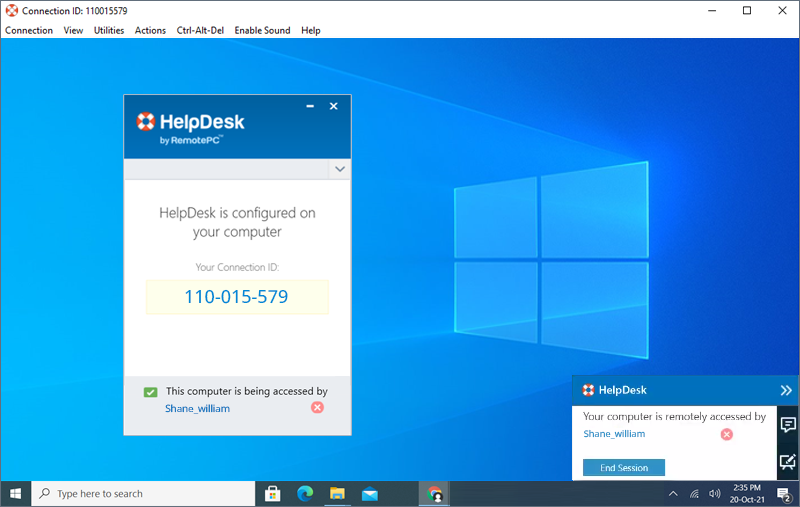
Remote sessions via HelpDesk are secured with TLS v1.2 / AES 256-bit encryption. However, if the remote access seems suspicious, you can uninstall the setup at any point of time. Simply click the 'End Session' button in the desktop notification. This will resolve the ticket and uninstall the HelpDesk application.
Yes, you can end an ongoing session by clicking 'End Session' in the desktop notification. The session will close and the setup will be automatically removed from your computer.
Mac OS Catalina requires user permission for applications to access privacy sensitive data. Hence you need to grant accessibility permissions to HelpDesk.
To authorize Helpdesk,
- Open System Preferences and go to the 'Security & Privacy' pane.
- Select 'Accessibility'.
- Click
 and provide system authentication to allow changes.
 - Select the checkbox next to 'RemotePCHDDesktop'.
To record screen content, the Mac OS Catalina requires user permission for applications, even while using other apps. Hence you need to grant screen recording permissions to HelpDesk.
To authorize HelpDesk,
- Open System Preferences and go to the 'Security & Privacy' pane.
- Select 'Screen Recording'.
- Click
 and provide system authentication to allow changes.
 - Select the checkbox next to 'RemotePCHDDesktop'
Yes, RemotePC™ HelpDesk can be integrated into four popular support platforms namely Zendesk Support, Freshdesk Support, and Freshservice Support. The HelpDesk integration enables technicians to initiate remote support sessions and access your customers' computers from within these support platforms.
Get the RemotePC HelpDesk app for free in the Zendesk Marketplace
Get the RemotePC HelpDesk app for free in the Freshdesk Marketplace
Get the RemotePC HelpDesk app for free in the Freshservice Marketplace
Note: Download and run the HelpDesk app launcher on your computer to connect to your customer computer via the RemotePC HelpDesk app from the preferred Support Platform.
To generate an API Key,
- Launch the HelpDesk web application and log in.
- Click the username displayed on the top-right corner and click 'My Account'.
- Go to 'Settings'.
- In the 'Third Party Integration' screen, click 'Generate API Key'
- Copy the key to facilitate third party integration.
On integration, users can launch HelpDesk connections directly from the third party interface.
HelpDesk Viewer Lite allows you to connect to a customer's computer from a web browser. During an ongoing remote support session, you can scale the remote computer screen, use Whiteboard, capture a snapshot of the computer screen, and lock the remote computer on session end.
No, you don't have to install any software to use HelpDesk Viewer Lite as it is a web-based application.
HelpDesk Viewer Lite is supported on the following browser versions:
Chrome: 67 and above
Safari: 11.0 and above
Firefox: 60.0 and above
Microsoft Edge: 42.17 and above
Note:
- IE, Opera and other browsers are not supported.
- By using the HelpDesk desktop application, technicians can perform all the remote access functions.
Yes, you can capture a snapshot of the customer computer screen and save it for future reference.
To take a snapshot,
- Log in to HelpDesk via a web browser and establish a remote connection with the customer computer.
- Click
 to expand the menu bar in HelpDesk Viewer Lite.
 - Click
 to take a snapshot.
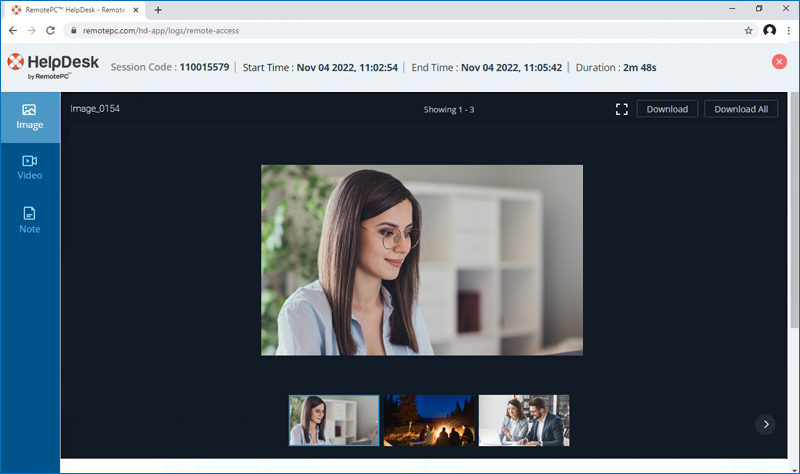
To view the saved recordings, go to 'Logs' > 'Remote Session Logs'. Click ![]() against the session to view the snapshots saved for the session.
against the session to view the snapshots saved for the session.
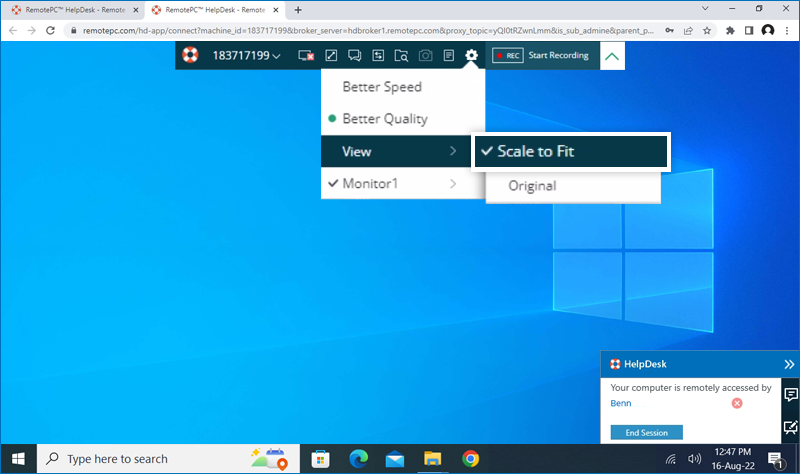
Yes, the computer's remote screen can be scaled to fit within your computer window.
- Log in to HelpDesk via a web browser and establish a remote connection with the customer computer.
- Click
 to expand the menu bar in HelpDesk Viewer Lite.
 -
Click
 and 'View' > 'Scale to fit'.
To enter the full-screen mode, click ![]() .
.
You can also adjust the speed of the screen updates and quality at which the remote screen updates are transmitted with the 'Better Speed' and 'Better Quality' options respectively.
To modify the screen resolution, click ![]() > click on the monitor you wish to modify > select the resolution.
> click on the monitor you wish to modify > select the resolution.
If you are remotely accessing a device with multiple monitors, HelpDesk allows you to view multiple remote screens in a single screen at the same time, or view each monitor on a different screen.
- Log in to HelpDesk via a web browser and establish a remote connection with the customer computer.
- Click
 to expand the menu bar in HelpDesk Viewer.
 - Click
 > choose monitor name to view that individual monitor. Alternatively, you can toggle between the screens by clicking
  on the menu bar.
To receive files from the customer's computer,
- Log in to HelpDesk via a web browser and establish a remote connection with the customer computer.
- Click
 to expand the menu bar in HelpDesk Viewer Lite.
 - Click
 . The file browser panel will appear.
 - Click 'Request Access' to send a request to the customer.
- Once the customer accepts the request, a tree view of the files on the customers' computer will be displayed in the panel.
-
Click on the file you wish to receive and click 'Download'. A success message will appear when the file is transferred to your computer.
Note: Only one file can be transferred at a time from the customer's computer.
- Click on the success message to view a summary of the file transfer.
Note: This functionality is currently unavailable for Edge browser.
Yes, you can record remote support sessions.
To record a session,
- Log in to HelpDesk via a web browser and establish a remote connection with the customer computer.
- Click
 to expand the menu bar in HelpDesk Viewer Lite.
 - Click 'Start Recording'.
- The recording will be saved automatically once the session ends. You can also click 'Stop Recording' to end recording the session and save it.
To view the saved recordings, go to 'Logs' > 'Remote Session Logs'. Click ![]() against the session to view the session recordings saved for the session.
against the session to view the session recordings saved for the session.
To initiate chat,
- Log in to HelpDesk via a web browser.
- In the 'Remote Support' tab, click 'Join Session' to initiate a connection.
-
Once the connection is established, click
 for starting a conversation.
Yes, you can take notes during an ongoing remote support session and save them for future reference.
To add notes during a session,
- Log in to HelpDesk via a web browser and establish a remote connection with the customer computer.
- Click
 to expand the menu bar in HelpDesk Viewer Lite.
 -
Click on the session code and select 'Notes'. Enter your notes in the text field and click 'Save' to save them in your computer.
Yes, you can switch from non-admin mode to admin mode during an ongoing session, without disconnecting the session
To switch to admin mode:
- Click
 and select 'Reconnect as Admin'.
- You will be prompted to enter credentials to access Admin privileges.
- Choose a method to enter credentials:
- Enter credentials by technician (You): Enter the Windows admin credentials for the remote computer and click 'OK'. After the remote user confirms authorization, you will be able to access the remote computer as an admin.
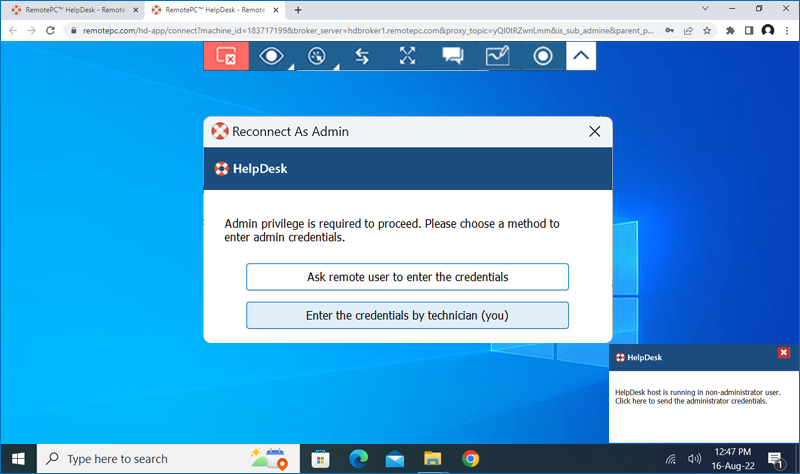
- Enter credentials by remote user: The remote user will be notified with a confirmation message. Wait for the remote user to confirm. Once the remote user confirms authorization, you will be able to access the remote computer as an admin.
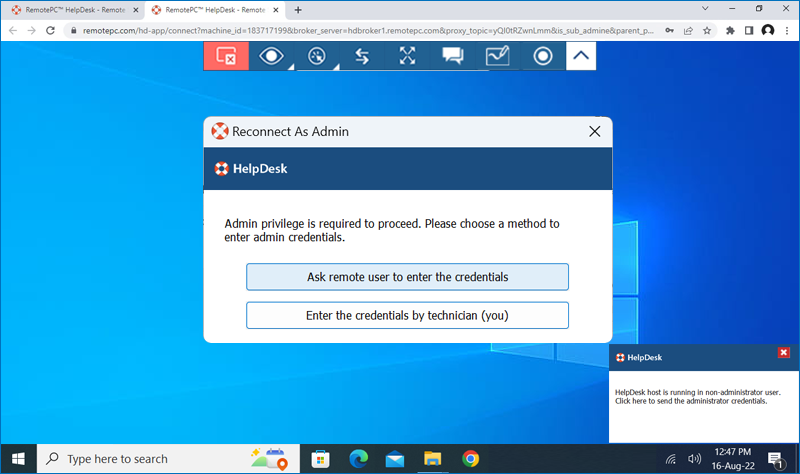
- Enter credentials by technician (You): Enter the Windows admin credentials for the remote computer and click 'OK'. After the remote user confirms authorization, you will be able to access the remote computer as an admin.
Yes, you can configure to lock the customer computer screen once the session ends.
To lock customer computer on session end,
- Log in to HelpDesk via a web browser and establish a remote connection with the customer computer.
- Click
 to expand the menu bar in HelpDesk Viewer.
 - Click the session code and select 'Lock on session end'.
Yes. While accessing a Windows machine, you can prevent users at the remote end from using mouse and keyboard during a session with the 'Block Remote Input' option.
To block remote input,
- Log in to HelpDesk via a web browser and establish a remote connection with the customer computer.
- Click
 to expand the menu bar in HelpDesk Viewer Lite.
 - Click the session code and select 'Block Remote Input'.
