The RDP Connector is a feature that enables you to remotely connect to Windows computers and servers via RDP. Install the Remote Desktop agent on your computers to configure remote access — you do not need to set up VPN or Microsoft RD gateway.
To remotely access computers via RDP,
- Go to the 'RDP Connector' tab and click 'Enable'.
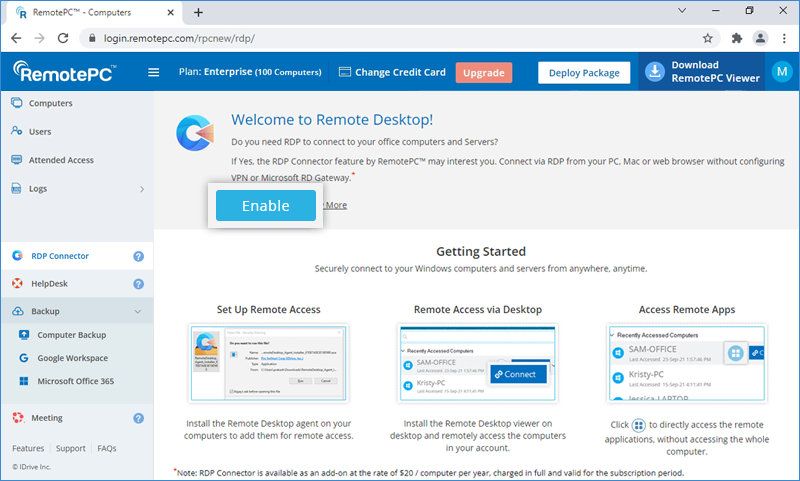
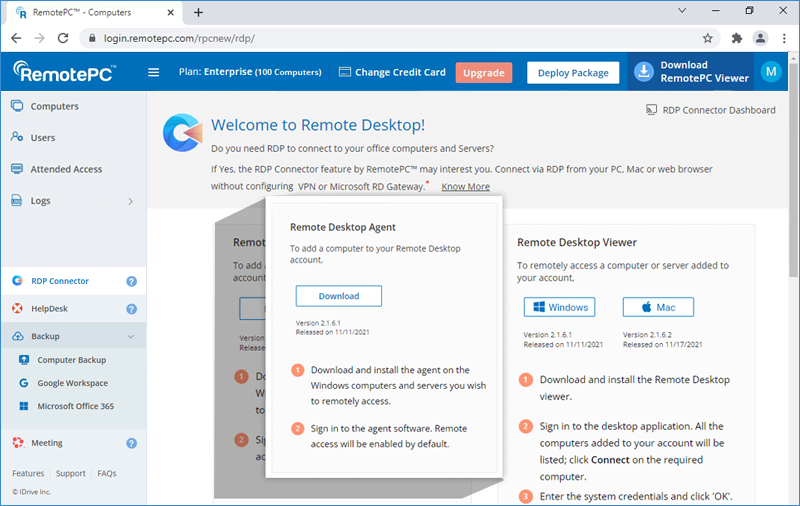
- Install the Remote Desktop agent on your local Windows computers and servers and sign in to add them for remote access. On sign in, remote access will be enabled by default.
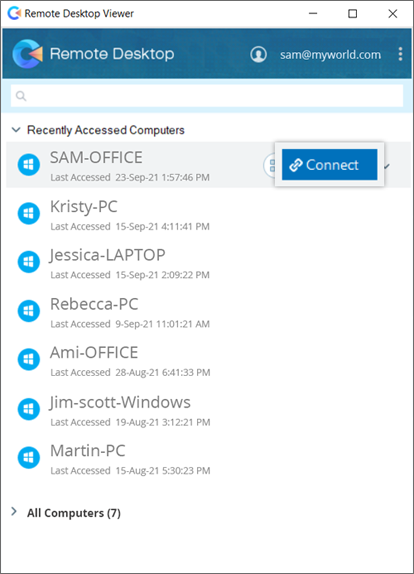
- Install the Remote Desktop viewer on your PC / Mac and sign in. All the computers on which you are signed in with the Remote Desktop agent will be displayed.
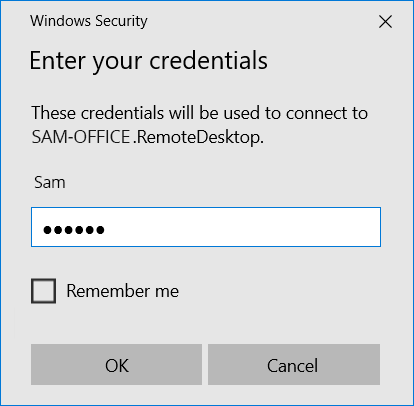
- Click 'Connect' corresponding to the required computer, enter your system credentials, and click 'OK' to connect.
For subsequent sign-ins from PCs, to switch the default user account, click 'More choices', select 'Use a different account', enter the system credentials of the remote device, and click 'OK'.
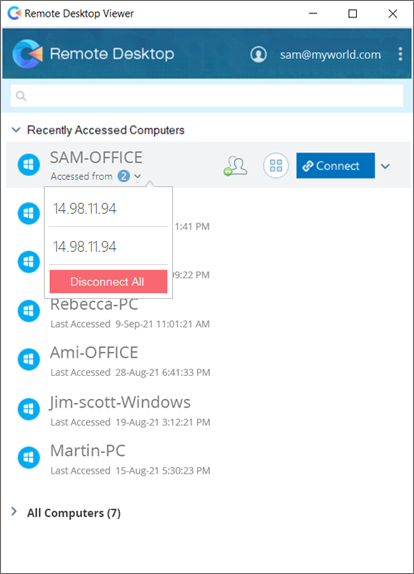
Note: You can use multiple computers / Remote Desktop viewers to connect to a computer simultaneously.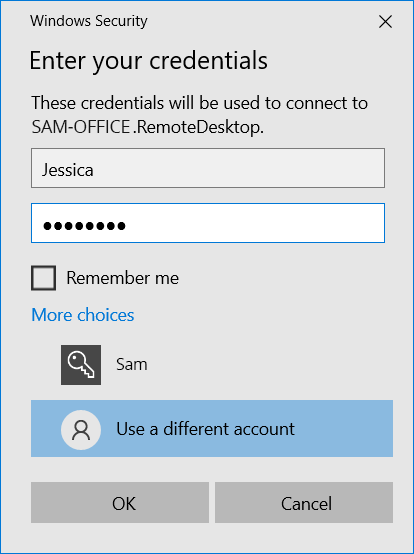
I have enabled the RDP Connector on my RemotePC account. Will I be charged? How does the billing work for the RDP connector usage?
No, you will not be charged for just enabling RDP Connector on your RemotePC account. You will only be charged when the Remote Desktop agent is installed and enabled on a computer. RDP Connector is available as an add-on at the rate of $20 / computer per year, charged in full and valid for the subscription period. You can delete RDP Connector computers from the Remote Desktop Viewer or RDP Connector Dashboard.
Note: RDP Connector add-on charges are billed separately and not included in your RemotePC subscription.
To remotely connect to an application installed on your computer,
- Sign in to the Remote Desktop viewer with your RemotePC credentials.
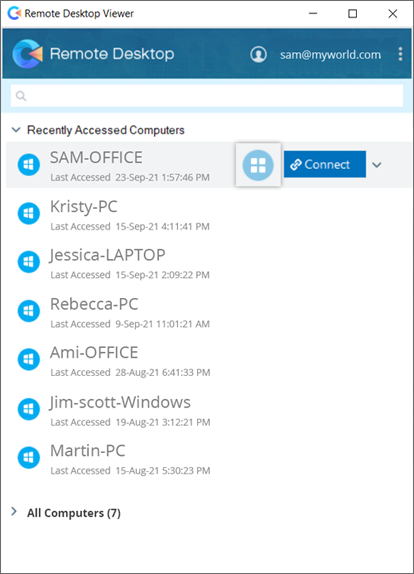
- Click
 corresponding to the required online computer or server.
- Enter the name of the remote application in the search bar or scroll down to find it. Click the application to launch it.
Alternatively, enter the name or path of the remote application in the field below and click 'Launch App'.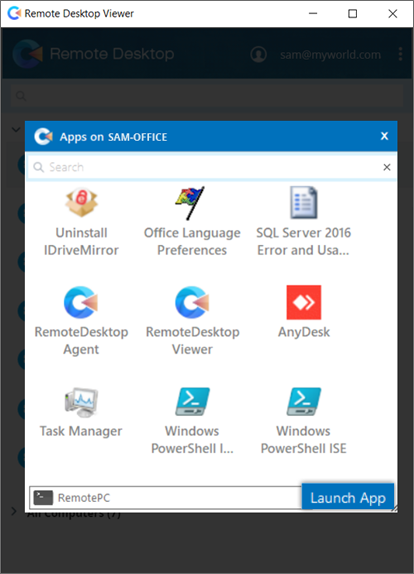
- Enter your system credentials and click 'OK' to connect. You will be connected to the remote application.
There could be one or more reasons for failed authentication:
Wrong credentials
- Be sure to enter the credentials of the remote Windows computer you are trying to connect to, and not your RemotePC credentials.
- Verify the username and its spelling. To switch the default user account, click 'More choices', and select 'Use a different account'.
Different domains
To establish a remote connection, both the local and the remote computer must be in the same network domain.
The target computer is a Microsoft Azure VM
An external RDP connection cannot access a VM on Microsoft Azure.
To disable remote access for a computer,
- Click
 .
. - Locate and open the Remote Desktop agent.
- Click 'Disable Remote Access'. Your computer will be disabled for remote access.
You can enable remote access for your computer at any time by clicking 'Enable Remote Access'.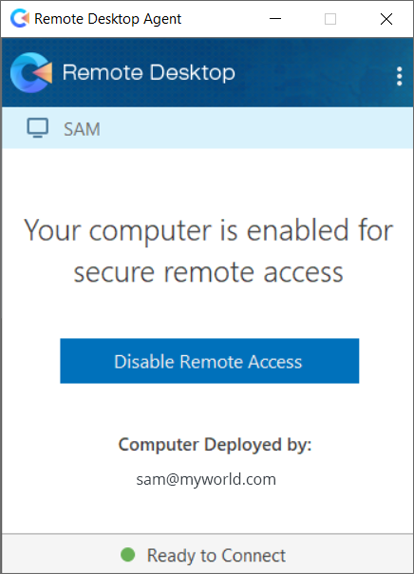
To remove a computer from remote access,
- Click
 . Locate and launch the Remote Desktop agent.
 - Click
 on the top right corner and click 'Sign out'.
 - Click 'Yes' to confirm'. The computer will be removed from your Remote Desktop viewer.
To configure proxy settings,
- Sign in to the Remote Desktop agent.
- Click on the top right corner and click 'Access Settings' or right-click the Remote Desktop agent tray icon and select 'Access Settings'.
- The following are the available options:
- No Proxy: This is a default setting.
- Auto Detect: Select 'Auto Detect' to get the proxy settings automatically.
- Manual: Select 'Manual' to configure the proxy server name, port, and authentication details.
To rename a remote computer,
- Sign in to the Remote Desktop viewer with your RemotePC credentials.
- Click
 corresponding to the computer you want to rename and click 'Rename'.
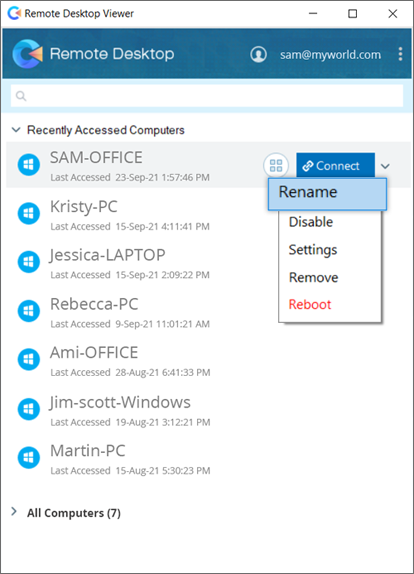
- Enter the new name for your remote computer.
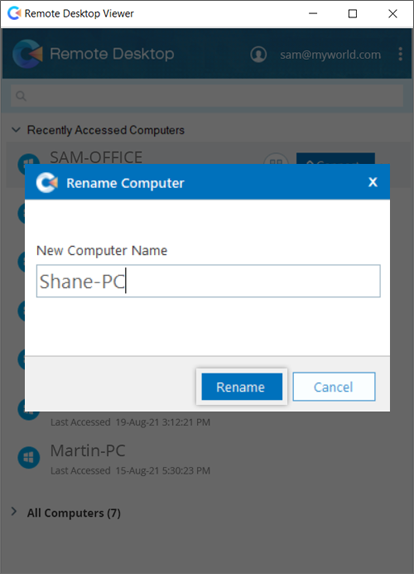
- Click 'Rename'.
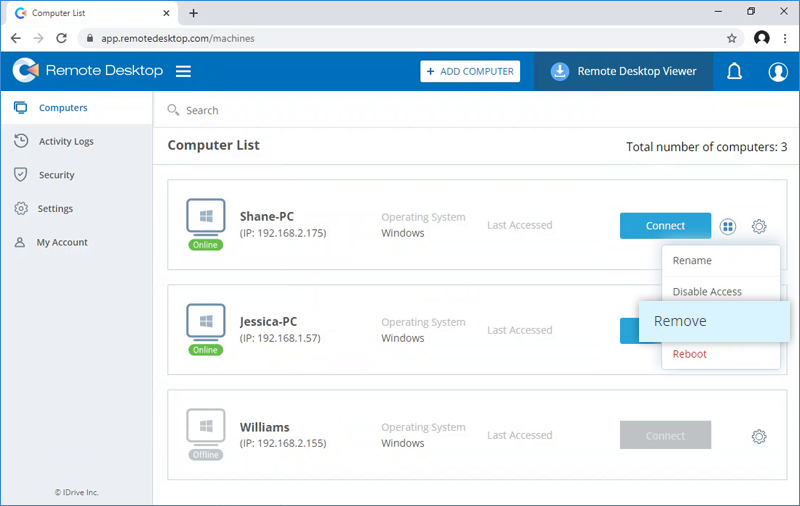
To remove a remote computer, click ![]() corresponding to the computer you want to remove, click 'Remove', and click 'Yes' to confirm.
corresponding to the computer you want to remove, click 'Remove', and click 'Yes' to confirm.
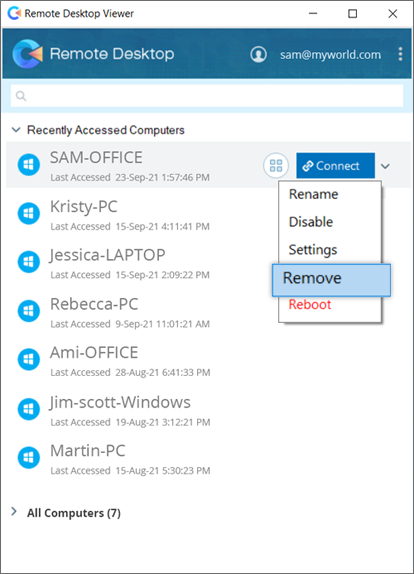
Alternatively, to remove the computer via the web,
- Sign in via the RemotePC web console.
- Go to the 'RDP Connector' tab, and click 'RDP Connector Dashboard'.
All the Windows computers and servers added to your account will be displayed in the 'Computers' tab of the web application. - Click
 and select 'Remove' to remove the computer.
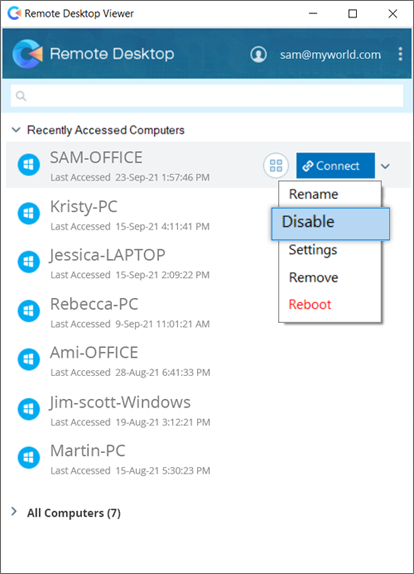
To disable remote access to a computer, click ![]() corresponding to the computer you want to disable and click 'Disable'. Click 'Yes' to proceed. On disabling a computer, you will no longer be able to access it.
corresponding to the computer you want to disable and click 'Disable'. Click 'Yes' to proceed. On disabling a computer, you will no longer be able to access it.
Remote Desktop viewer optimizes RDP-based access to enable fast access. For most locations, the RDP connections via Remote Desktop viewer may allow nearly 60 Frame Per Second (FPS). This makes gaming, 3D designs, and related remote access possible.
Yes, once you are connected to your remote computer, you can easily share files and folders between your local and remote computers. The connections support copy-paste of multiple files / folders between your local and remote computer during an ongoing session.
Yes, you can transfer files / folders between the Windows computers added to the Remote Desktop viewer and any local Mac system. However, you cannot configure Mac and Linux computers for remote access.
Yes, you can play music and watch videos on the remote computer from your local computer. You can even run programs and use software installed on your remote computer.
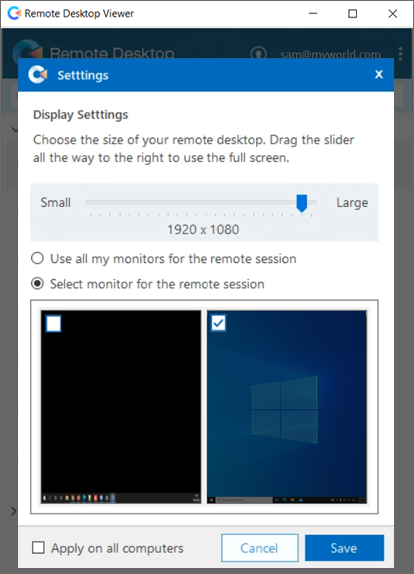
Yes, if your remote computer has multiple monitors, the Remote Desktop viewer allows you to view and switch between the multiple screens.
To work on multiple remote monitors,
- Sign in to the Remote Desktop viewer with your RemotePC credentials.
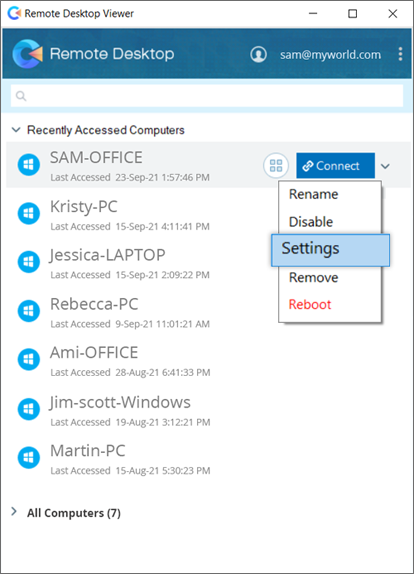
- Click
 corresponding to the required computer and select 'Settings'.
- Select the 'Use all my monitors for the remote session' checkbox and click 'Save'. Select 'Apply on all computers' to enable multi-monitor features during all remote sessions.
You can also choose to use the 'Select monitor for the remote session' option to work on a specific monitor.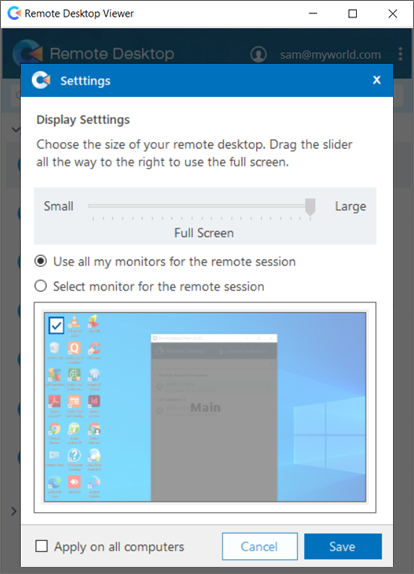
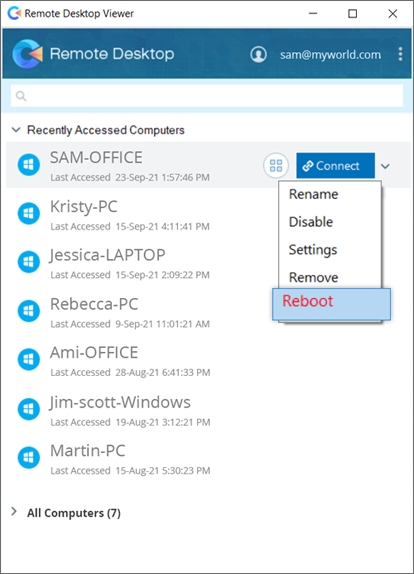
To restart a remote computer,
- Sign in to the Remote Desktop viewer with your RemotePC credentials.
- Click
 corresponding to the required computer.
 - Select 'Reboot' and click 'Yes' to confirm.
Your computer will go offline briefly, but once it is online again and ready for remote connection, its status will change to 'online'. Refresh the computer list manually to see the change.
The Wake-on-LAN feature in Remote Desktop viewer allows you to wake up your offline remote computers for establishing a connection from anywhere.
Read about the hardware requirements and settings configuration needed to successfully use the WoL feature on Windows computers.
To wake up an offline remote computer,
- Sign in to the Remote Desktop viewer with your RemotePC credentials.
- Click
 corresponding to the required offline computer and select 'Wake Up'.
 - Click 'OK' to confirm.
Note: To successfully wake up an offline computer, at least one of the other computers added to the Remote Desktop viewer must be online and on the same LAN.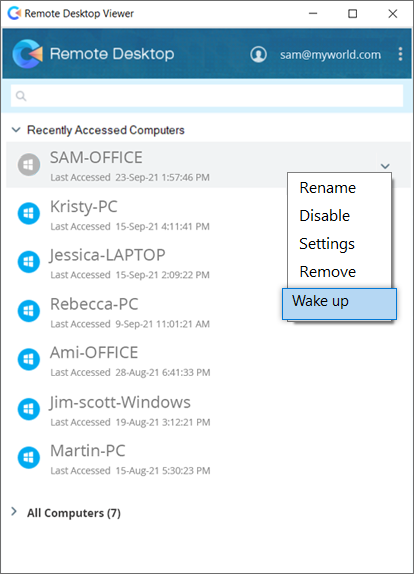
To make a local device or resource available within a remote session,
- Go to the 'RDP Connector' tab and click 'RDP Connector Dashboard'.
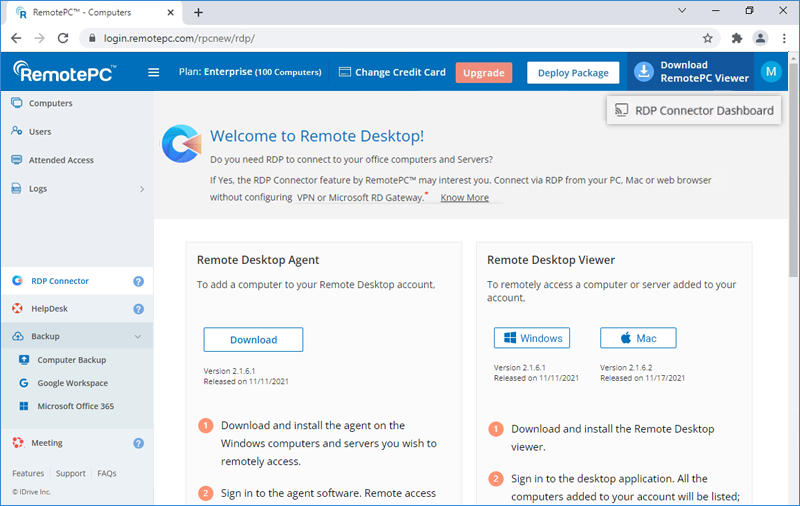
- Navigate to the 'Settings' > 'Local Devices and Resources'.
- Select the devices and resources you want to access in the remote sessions.
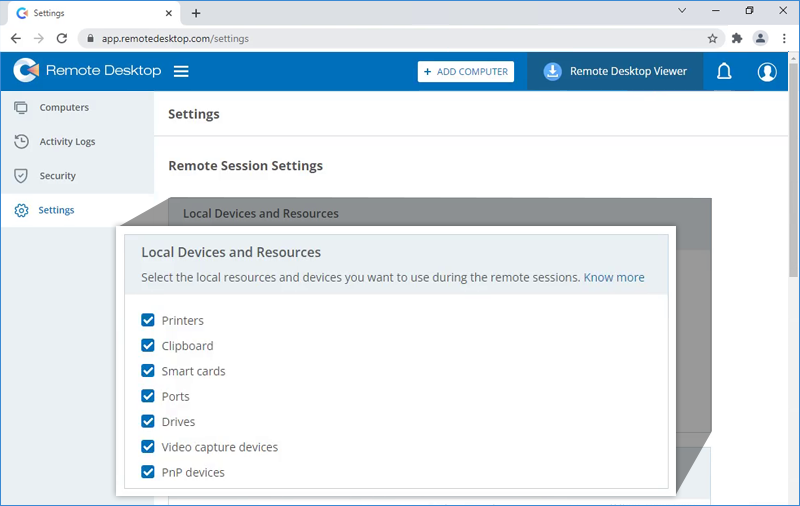
- Click 'Save Changes'.
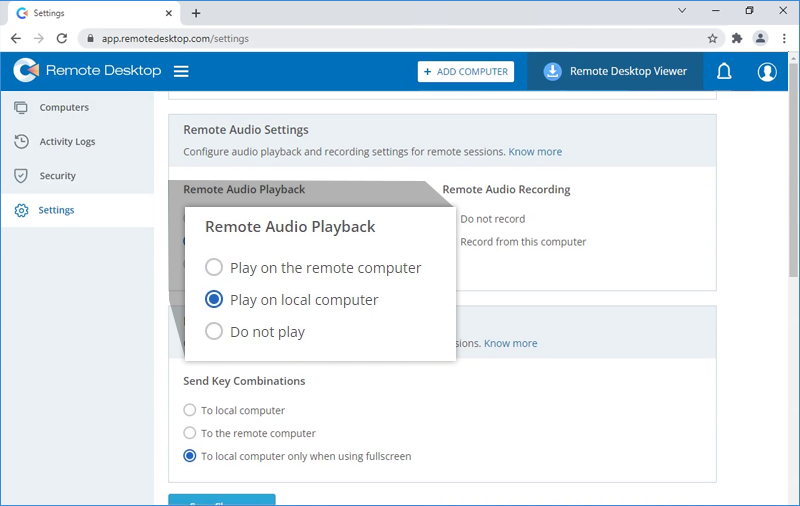
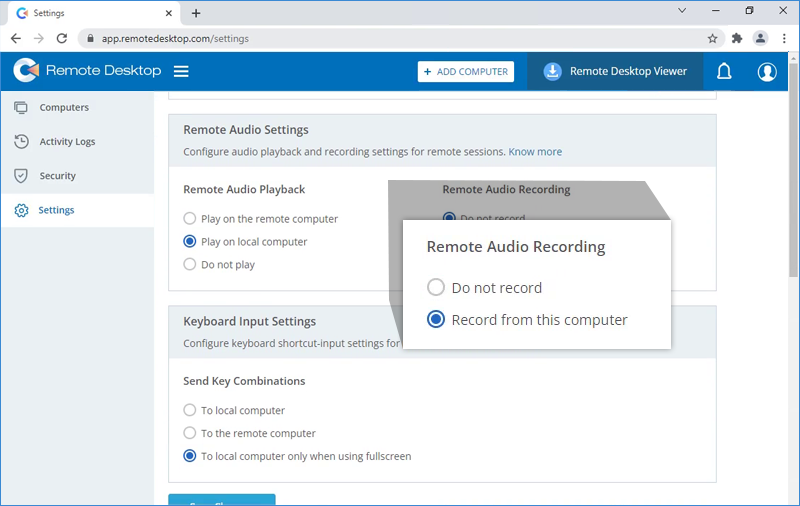
To manage your RDP Connector audio settings,
- Go to the 'RDP Connector' tab and click 'RDP Connector Dashboard'.
- Go to the 'Settings' > 'Remote Audio Playback'. Select your output source for remote sound: 'Play on the remote computer', 'Play on local computer', or 'Do not play'.
- Manage remote session recording in the 'Remote Audio Recording' section. You can choose to disable remote session recording or select 'Record from this computer' and save session recordings in the local computer.
Yes, you can configure the keyboard input settings and send keyboard shortcuts to the remote computer during a remote session.
To enable keyboard input,
- Go to the 'RDP Connector' tab and click 'RDP Connector Dashboard'.
- Go to the 'Settings' > 'Keyboard Input Settings'. Select the 'To the remote computer' checkbox.
Alternatively, select 'To local computer only when using full screen' if this option is more suitable.
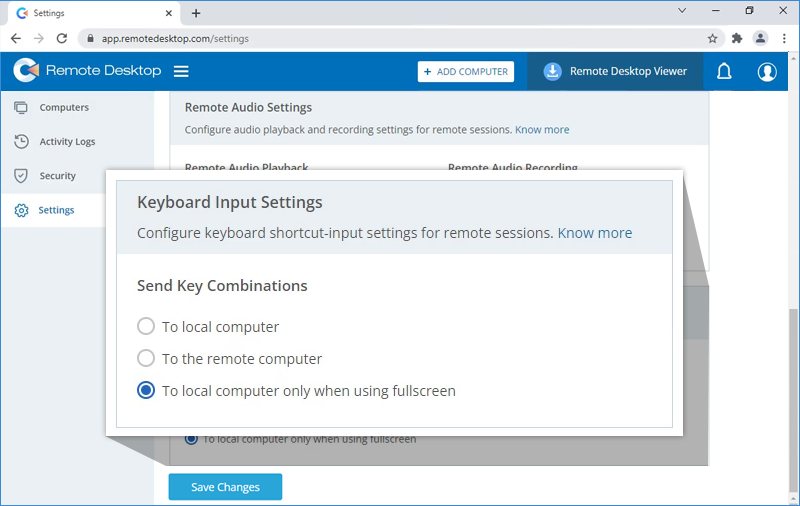
- Click 'Save Changes'.
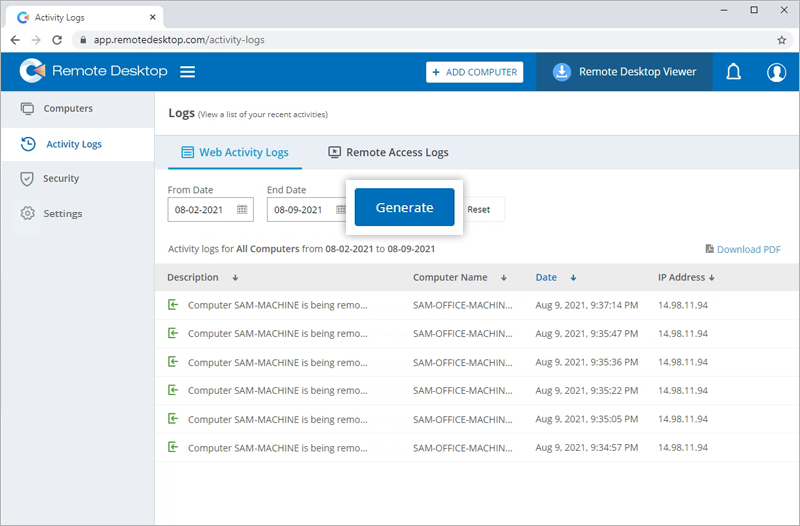
You can view and generate report of your RDP Connector activities from the 'Activity Logs' tab of the RDP Connector web application.
To view the web activity logs,
- Go to the 'RDP Connector' tab and click 'RDP Connector Dashboard'.
- Navigate to 'Activity Logs' > 'Web Activity Logs'.
- Choose the computer name from the dropdown menu, select 'From Date' and 'End Date', and click 'Generate'. The web activity logs of the computer will be displayed.
To view remote access logs,
- Go to the 'RDP Connector' tab and click 'RDP Connector Dashboard'.
- Navigate to 'Activity Logs' > 'Remote Access Logs'.
- Choose the computer name from the dropdown menu, select 'From Date' and 'End Date', and click 'Generate'. The remote access logs of the computer will be displayed.
Yes, the remote sessions operate over end-to-end encrypted RDP channels with TLS and 256-bit AES encrypted connections. The encryption prevents anyone from viewing your session by listening on the network.
Every session is based on private / public key exchange from the remote to the local computer. The technology is based on the same standards as TLS / SSL and meets today's standards for security. The key exchange further guarantees viewer-to-host data protection. This means that even RemotePC routing servers cannot read the data stream.
All program files are secured using DigiCert code-signing technology allowing for origin verification of the executable.
No, the connections will not expose or change any local firewall settings so, your local environment is safe during the remote access sessions.
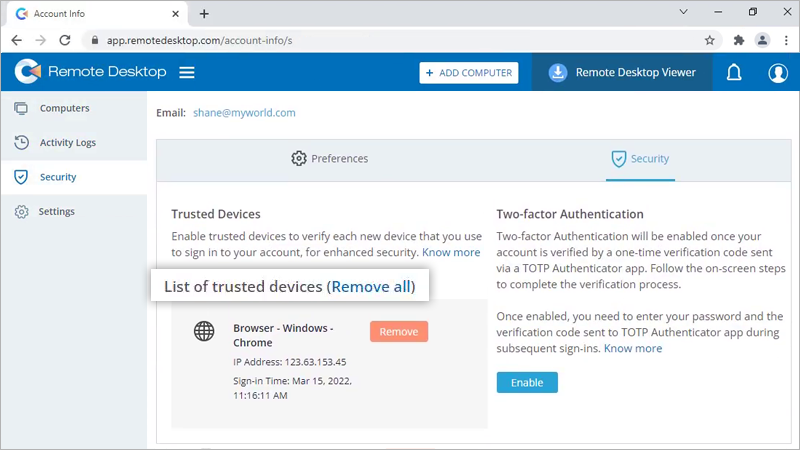
When you click 'RDP Connector Dashboard' and launch RDP Connector web, your account is automatically added to the 'Trusted Devices' list.
To view and manage your list of your trusted devices, navigate to 'My Account' > 'Security' > 'List of trusted devices'.
To set up two-factor authentication,
- Go to the 'RDP Connector' tab and click 'RDP Connector Dashboard'.
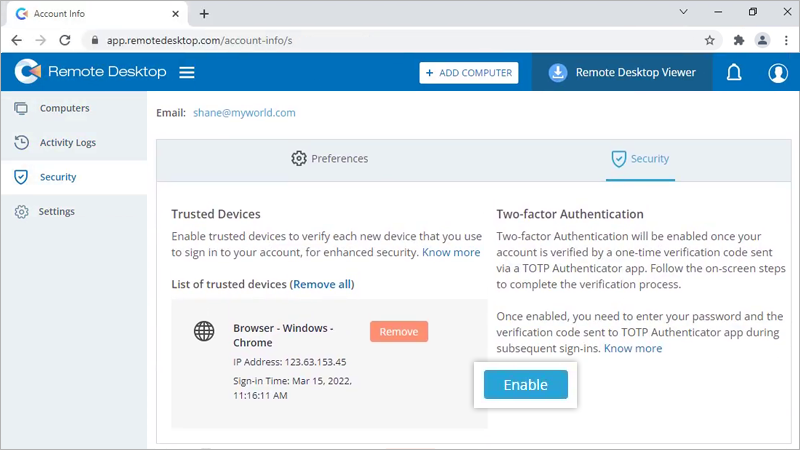
- Navigate to 'Security' > 'Two-factor authentication'.
- Click 'Enable'. The 'Enable Time-based OTP Authentication' window appears with a QR code and an option to 'enter key manually'.
- Launch any Time-based OTP authenticator app on your mobile device and scan the QR code displayed on your computer screen.
You can also view the key by clicking 'enter key manually' and type it manually on your mobile device.
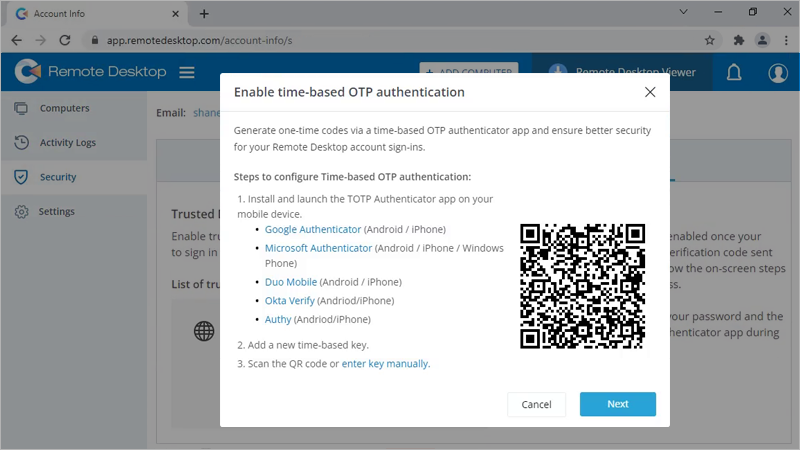
- Click 'Next'.
- Copy the recovery code displayed on your computer screen. Click 'Download' to download the code as a .txt file, or click 'Print' to print the same.
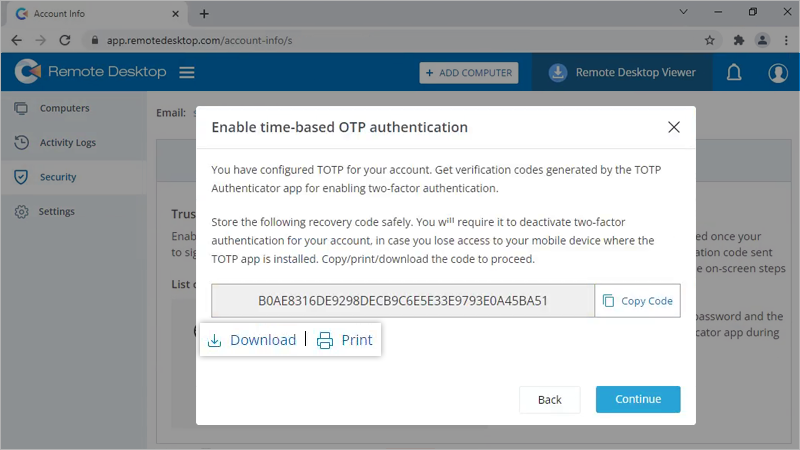
Note: You will require the recovery code to disable two-factor authentication for your account, in case you lose access to your mobile device where the Time-based OTP authenticator app is installed.
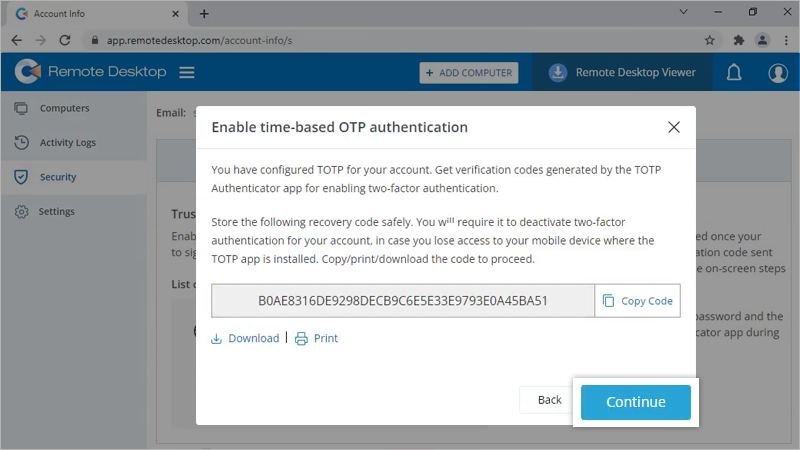
- Click 'Continue'.
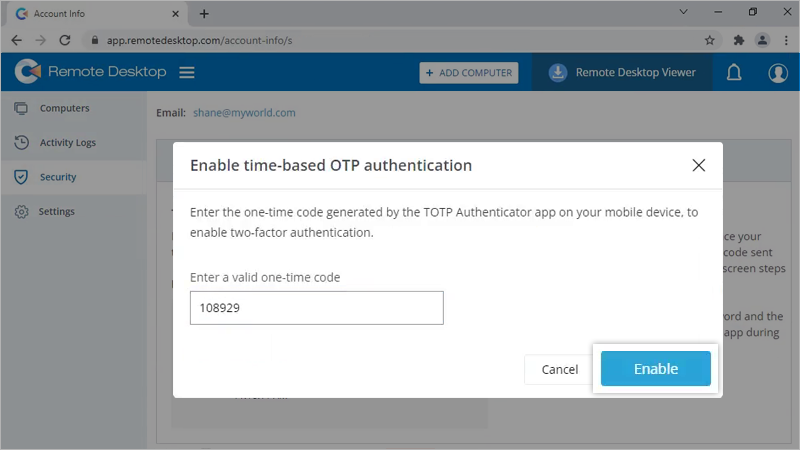
- Enter the one-time code generated by the TOTP app in your mobile device and click 'Enable'. Two-factor authentication via Time-based OTP authentication will be enabled for your RDP Connector web account.
Single Sign-on (SSO) is a one-credential solution for signing into multiple applications. You can set up SSO with the identity provider (IdP) of your choice and enable users to access RDP Connector Dashboard using the IdP credentials, without another password to manage. It encourages stronger passwords and allows better credential management.
Note: Admin will not be able to sign in using SSO.
To set up SSO, you need to configure your identity provider and then configure your RDP Connector Dashboard. Admin can configure SSO for users and enable their access to RDP Connector Dashboard by signing in to a central identity provider.
To configure SSO for your RDP Connector Dashboard,
- Go to the 'RDP Connector' tab and click 'RDP Connector Dashboard'.
- Navigate to 'My Account' > 'Single Sign-On'.
- Enter a name for your SSO profile.
- Enter the URLs and add the X.509 certificate received from your IdP.
Note: X.509 certificate should only be in .pem or .cer format. - Click 'Configure Single Sign-On'.
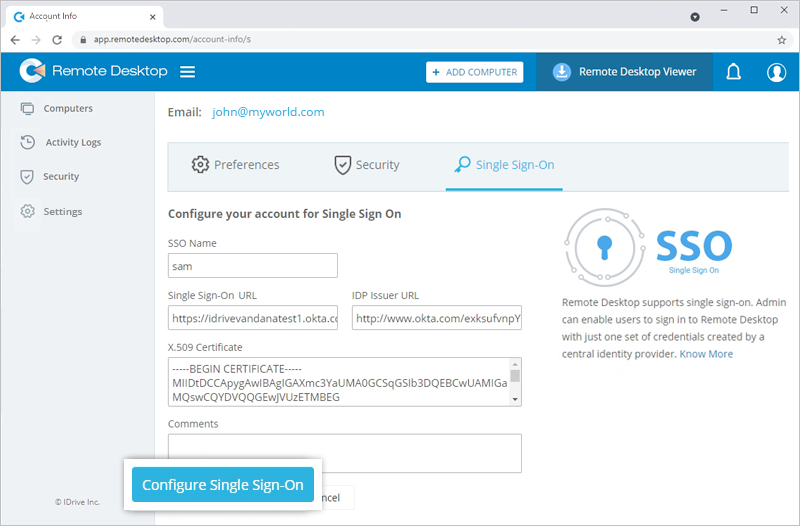
Note: The SSO configuration will be implemented only for your RDP Connector Dashboard. You can manage SSO for your RemotePC account on the My Accounts section of the RemotePC web application.
To edit an SSO profile,
- Go to the 'RDP Connector' tab and click 'RDP Connector Dashboard'.
- Navigate to 'My Account' > 'Single Sign-On'.
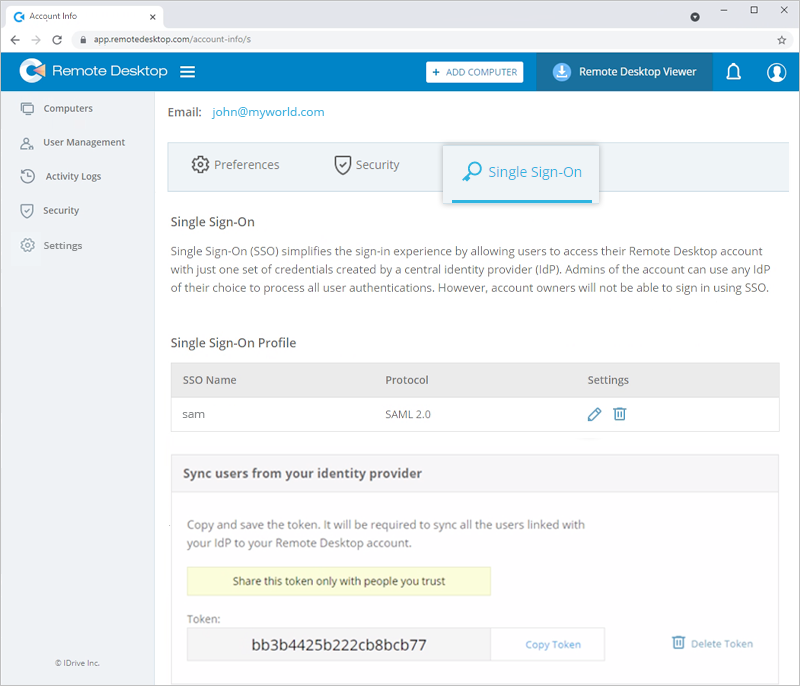
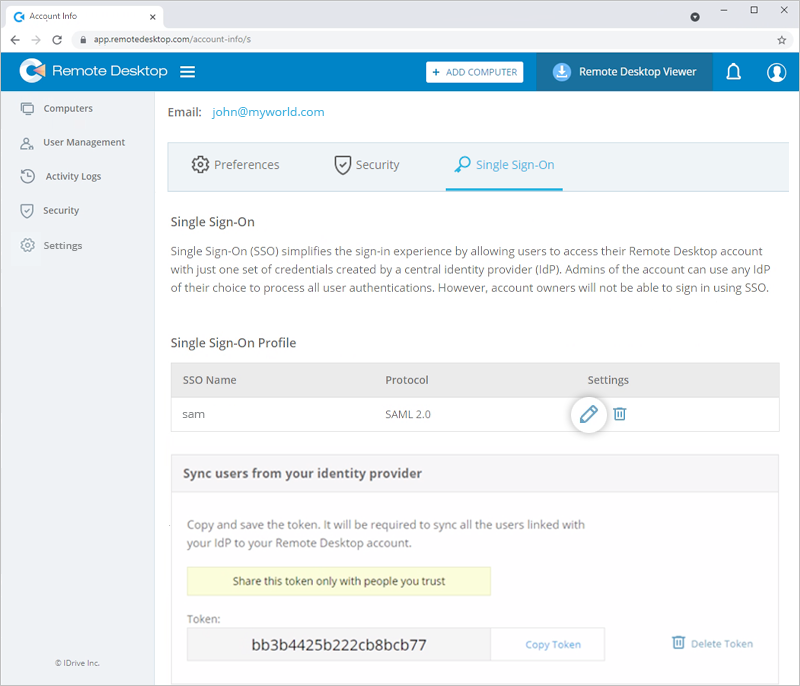
- Click
 corresponding to the SSO profile you wish to edit.
- Edit as per your requirement and click 'Update Single Sign-On'.
Note: You can edit the SSO name, Single Sign-On URL, IDP issuer URL, and X.509 Certificate, and add comments.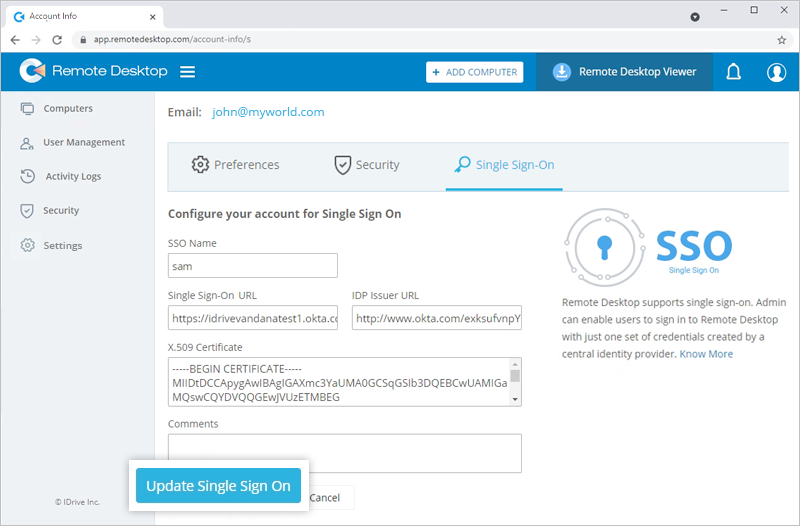
The SSO profile will be updated.
Yes, you can remove an SSO profile from your account.
To remove an SSO profile,
- Go to the 'RDP Connector' tab and click 'RDP Connector Dashboard'.
- Navigate to 'My Account' > 'Single Sign-On'.
- Click
 corresponding to the SSO profile you wish to delete.
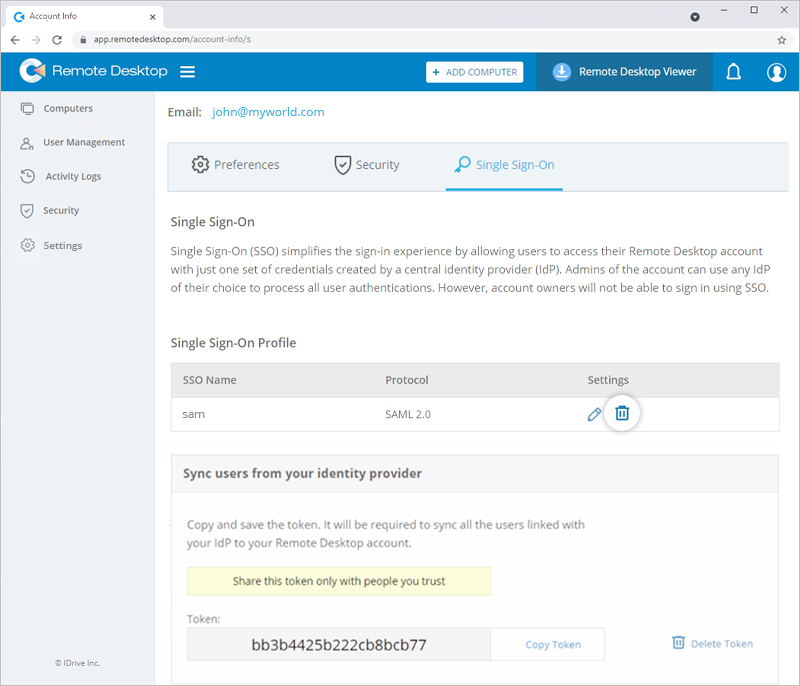
- Click 'Delete' in the confirmation popup to remove the SSO profile.
Deleting the SSO profile will remove Single Sign-On for all users linked with this profile and they will have to use their registered email and password for sign-in.
RDP Connector Dashboard supports sign-in via credentials created using Standard Assertion Markup Language (SAML) 2.0. SAML URLs and certificate is needed for implementing SAML authentication, which can be obtained from any supported IdP.
Once you register with an IdP of your choice, you will receive the following:
- IdP Issuer URL: This URL uniquely identifies the application for which the Single Sign-On is being configured.
- Single Sign-On URL: This URL processes an authentication request from the user's browser and returns an authentication response to verify the user.
- X.509 certificate (Base64): An X.509 certificate is a security certificate that you receive from your identity provider to verify your identity. It comes in different formats, but RDP Connector Dashboard only accepts .pem or .cer format.
To sign in to the RDP Connector Dashboard via SSO, a user needs to,
- Click 'Single Sign-On (SSO)' on the sign-in screen.
- Enter 'Email Address' and click 'Sign in'. The user will be redirected to the IdP web sign-in page.
- Enter the username and password registered with the IdP, when prompted to enter credentials. On successful validation of user identity, the user will be redirected to the RDP Connector Dashboard.